

Angular 組件間溝通最常見的方向有三種:父元件傳資料給子元件、子元件送事件回父元件、以及多個元件透過 service 共用訊息流。父傳子通常用 `@Input()`,子傳父通常用 `@Output()` 搭配 `EventEmitter`,當元件關係不只一層或需要雙向通知時,service 搭配 RxJS `Subject` 會比較清楚。
這篇筆記整理 Angular 官方 component interaction 範例裡幾種典型做法,包含輸入綁定、getter/setter、`ngOnChanges()`、template local variable,以及透過 service 讓 parent 與 children 溝通。
Angular 父元件如何用 @Input 傳資料給子元件?
Angular 父傳子資料使用 `@Input()` 宣告子元件可接收的屬性。父元件在 template 中用屬性綁定把資料傳入,子元件就能像使用本地屬性一樣讀取。
這是接受資料的子元件 `hero-child.component.ts`。子元件要被輸入的屬性有兩個,以 `@Input()` 開頭宣告:
```ts
import { Component, Input } from '@angular/core';
import { Hero } from './hero';
@Component({
selector: 'app-hero-child',
template: `
{{hero.name}} says:
I, {{hero.name}}, am at your service, {{masterName}}.
`
})
export class HeroChildComponent {
@Input() hero: Hero;
@Input('master') masterName: string;
}
```
父元件透過屬性綁定將值塞進子元件:
```html
<app-hero-child
*ngFor="let hero of heroes"
[hero]="hero"
[master]="master">
```
父元件的完整程式碼如下:
```ts
import { Component } from '@angular/core';
import { HEROES } from './hero';
@Component({
selector: 'app-hero-parent',
template: `
{{master}} controls {{heroes.length}} heroes
<app-hero-child *ngFor="let hero of heroes"
[hero]="hero"
[master]="master">
`
})
export class HeroParentComponent {
heroes = HEROES;
master = 'Master';
}
```
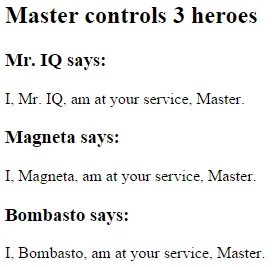
執行後,父元件會把 `heroes` 陣列中的每一筆 `hero` 與 `master` 字串傳給子元件:
Angular 子元件如何攔截 @Input 屬性的設定?
Angular 子元件可以把 `@Input()` 寫在 setter 上,在資料進入元件時先做清理、預設值補齊或格式轉換。這種做法適合處理單一輸入值。
可將子元件的 input 宣告改為 getter 和 setter,如下面範例:
```ts
import { Component, Input } from '@angular/core';
@Component({
selector: 'app-name-child',
template: '<h3>"{{name}}"</h3>'
})
export class NameChildComponent {
private _name = '';
@Input()
set name(name: string) {
this._name = (name && name.trim()) || '<no name set>';
}
get name(): string {
return this._name;
}
}
```
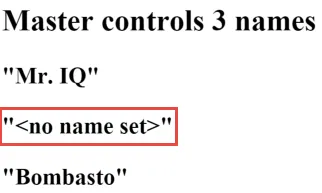
這樣當父元件傳空字串來時,子元件會自動輸出 `<no name set>` 字樣。setter 的好處是邏輯集中在輸入點,不需要在 template 裡散落多個判斷式。
Angular 什麼時候要用 ngOnChanges() 追蹤 Input 變化?
Angular `ngOnChanges()` 適合追蹤多個 `@Input()` 的變化,尤其是需要比較前後值、記錄變更歷程或依不同欄位做不同反應時。單一欄位清理通常用 setter 就夠。
在子元件裡,除了使用 getter 及 setter,也可以利用 `ngOnChanges()` 取得改變的變數並做出回應。`ngOnChanges()` 會傳入所有被改變的值,型別是 `changes: {[propKey: string]: SimpleChange}`。
子元件內容:
```ts
import { Component, Input, OnChanges, SimpleChange } from '@angular/core';
@Component({
selector: 'app-version-child',
template: `
Version {{major}}.{{minor}}
Change log:
- {{change}}
`
})
export class VersionChildComponent implements OnChanges {
@Input() major: number;
@Input() minor: number;
changeLog: string[] = [];
ngOnChanges(changes: {[propKey: string]: SimpleChange}) {
let log: string[] = [];
for (let propName in changes) {
let changedProp = changes[propName];
let to = JSON.stringify(changedProp.currentValue);
if (changedProp.isFirstChange()) {
log.push(`Initial value of ${propName} set to ${to}`);
} else {
let from = JSON.stringify(changedProp.previousValue);
log.push(`${propName} changed from ${from} to ${to}`);
}
}
this.changeLog.push(log.join(', '));
}
}
```
父元件內容:
```ts
import { Component } from '@angular/core';
@Component({
selector: 'app-version-parent',
template: `
Source code version
`
})
export class VersionParentComponent {
major = 1;
minor = 23;
newMinor() {
this.minor++;
}
newMajor() {
this.major++;
this.minor = 0;
}
}
```

這個範例會在 `major` 或 `minor` 改變時,把初始值與後續變化記錄到 `changeLog`。
Angular 子元件如何用 @Output 通知父元件?
Angular 子傳父事件使用 `@Output()` 宣告 `EventEmitter`。子元件在內部事件發生時呼叫 `emit()`,父元件在 template 中用事件綁定接收 `$event`。
子元件的 `EventEmitter` 是一個輸出的屬性,通常用 `@Output()` 宣告,如下:
```ts
import { Component, EventEmitter, Input, Output } from '@angular/core';
@Component({
selector: 'app-voter',
template: `
{{name}}
`
})
export class VoterComponent {
@Input() name: string;
@Output() onVoted = new EventEmitter<boolean>();
voted = false;
vote(agreed: boolean) {
this.onVoted.emit(agreed);
this.voted = true;
}
}
```
父元件內容如下:
```ts
import { Component } from '@angular/core';
@Component({
selector: 'app-vote-taker',
template: `
Should mankind colonize the Universe?
Agree: {{agreed}}, Disagree: {{disagreed}}
<app-voter *ngFor="let voter of voters"
[name]="voter"
(onVoted)="onVoted($event)">
`
})
export class VoteTakerComponent {
agreed = 0;
disagreed = 0;
voters = ['Mr. IQ', 'Ms. Universe', 'Bombasto'];
onVoted(agreed: boolean) {
agreed ? this.agreed++ : this.disagreed++;
}
}
```

父元件在 `(onVoted)="onVoted($event)"` 接到布林值後,更新同意與不同意的票數。
Angular 父元件如何用 template local variable 操作子元件?
Angular template local variable 可以讓父元件 template 直接呼叫子元件公開方法或讀取公開屬性。這種做法適合簡單、同一個 template 內的互動。
下面是範例,將子元件使用 `#timer` 宣告為 template 變數,就可以在父元件 template 裡使用子元件變數與方法:
```html
Countdown to Liftoff (via local variable)
```
`#timer` 指向 `app-countdown-timer` 這個子元件實例,因此父元件 template 可以呼叫 `timer.start()`、`timer.stop()`,也可以顯示 `timer.seconds`。如果父元件 TypeScript class 也需要操作子元件,通常會改用 `@ViewChild()`。
Angular 父子元件如何透過 Service 溝通?

Angular service 適合處理跨元件、跨層級或雙向的訊息交換。父元件與子元件注入同一個 service 後,可以用 RxJS `Subject` 建立 Observable 串流來發送與接收訊息。
服務內容:
```ts
import { Injectable } from '@angular/core';
import { Subject } from 'rxjs/Subject';
@Injectable()
export class MissionService {
// Observable string sources
private missionAnnouncedSource = new Subject<string>();
private missionConfirmedSource = new Subject<string>();
// Observable string streams
missionAnnounced$ = this.missionAnnouncedSource.asObservable();
missionConfirmed$ = this.missionConfirmedSource.asObservable();
// Service message commands
announceMission(mission: string) {
this.missionAnnouncedSource.next(mission);
}
confirmMission(astronaut: string) {
this.missionConfirmedSource.next(astronaut);
}
}
```
父元件內容:
```ts
import { Component } from '@angular/core';
import { MissionService } from './mission.service';
@Component({
selector: 'app-mission-control',
template: `
Mission Control
<app-astronaut *ngFor="let astronaut of astronauts"
[astronaut]="astronaut">
History
- {{event}}
`,
providers: [MissionService]
})
export class MissionControlComponent {
astronauts = ['Lovell', 'Swigert', 'Haise'];
history: string[] = [];
missions = [
'Fly to the moon!',
'Fly to mars!',
'Fly to Vegas!'
];
nextMission = 0;
constructor(private missionService: MissionService) {
missionService.missionConfirmed$.subscribe(
astronaut => {
this.history.push(`${astronaut} confirmed the mission`);
});
}
announce() {
let mission = this.missions[this.nextMission++];
this.missionService.announceMission(mission);
this.history.push(`Mission "${mission}" announced`);
if (this.nextMission >= this.missions.length) {
this.nextMission = 0;
}
}
}
```
子元件內容:
```ts
import { Component, Input, OnDestroy } from '@angular/core';
import { MissionService } from './mission.service';
import { Subscription } from 'rxjs/Subscription';
@Component({
selector: 'app-astronaut',
template: `
{{astronaut}}: <strong>{{mission}}</strong>
<button
(click)="confirm()"
[disabled]="!announced || confirmed">
Confirm
`
})
export class AstronautComponent implements OnDestroy {
@Input() astronaut: string;
mission = '<no mission announced>';
confirmed = false;
announced = false;
subscription: Subscription;
constructor(private missionService: MissionService) {
this.subscription = missionService.missionAnnounced$.subscribe(
mission => {
this.mission = mission;
this.announced = true;
this.confirmed = false;
});
}
confirm() {
this.confirmed = true;
this.missionService.confirmMission(this.astronaut);
}
ngOnDestroy() {
// prevent memory leak when component destroyed
this.subscription.unsubscribe();
}
}
```
這個範例把 `MissionService` 放在父元件的 `providers`,因此父元件與底下的 astronaut 子元件會共用同一個 service 實例。子元件在 `ngOnDestroy()` 取消訂閱,是為了避免元件銷毀後還留著 Observable subscription。
Angular 組件溝通方式應該怎麼選?
Angular component communication 可以先看資料流方向與元件距離。父子一層關係優先用 `@Input()` 與 `@Output()`,跨層或多個元件共享狀態再考慮 service。
| 情境 | 建議做法 | 適合原因 |
|---|---|---|
| 父元件傳資料給子元件 | `@Input()` | 單向資料流清楚,template 一眼看得出資料來源 |
| 子元件通知父元件 | `@Output()` + `EventEmitter` | 子元件不需要知道父元件怎麼處理事件 |
| 子元件需要清理單一輸入值 | `@Input()` setter | 邏輯集中在輸入點,適合 trim、預設值、格式轉換 |
| 子元件要比較多個輸入前後變化 | `ngOnChanges()` | 可以拿到 previous value、current value 與 first change |
| 父元件 template 操作子元件 | template local variable | 適合簡單互動,不必增加 TypeScript 程式 |
| 多個元件共享事件或狀態 | service + RxJS `Subject` | 避免多層 `@Input()` / `@Output()` 傳遞造成 template 變複雜 |
我自己的判斷順序會從最明確的資料流開始:父傳子先用 `@Input()`,子傳父先用 `@Output()`。當事件開始跨越多層元件,或同一份狀態要被多個兄弟元件共享,才把溝通邏輯移到 service。
延伸閱讀
- 建立一個 Angular 5 的專案
- Angular Template-Driven Forms 教學:ngModel、驗證與自訂 Validator
- Angular NgModule 完整解析:模組結構、依賴注入與 forRoot 用法
- Angular Router 基礎教學:Routes、RouterLink、RouterOutlet 與路由事件
- Angular HttpClient 教學:GET、POST、Header、Params 與錯誤處理
常見問題
Angular 父傳子資料一定要用 @Input 嗎?
父子元件一層關係中,Angular 父傳子資料最標準的做法就是 `@Input()`。如果資料需要被許多不相鄰的元件共享,再考慮用 service 或狀態管理工具。
Angular 子元件可以直接改父元件資料嗎?
Angular 子元件不建議直接修改父元件資料。比較清楚的做法是子元件用 `@Output()` 發出事件,父元件收到事件後自己決定如何更新狀態。
@Input setter 和 ngOnChanges() 差在哪裡?
`@Input()` setter 適合處理單一輸入值,例如 trim 字串或補預設值。`ngOnChanges()` 適合同時觀察多個輸入屬性,並比較 previous value 與 current value。
EventEmitter 要放在 @Input 還是 @Output?
`EventEmitter` 通常放在 `@Output()`,用來讓子元件發事件給父元件。`@Input()` 是接收外部傳入資料,兩者方向不同。
什麼時候 Angular 元件溝通要改用 service?
當資料或事件需要跨過多層元件、被多個兄弟元件共享,或用 `@Input()` / `@Output()` 會讓 template 串太長時,就適合改用 service。service 可以把事件流集中管理,元件只負責訂閱與發送。
參考資料
最後更新
2017-12-30。本文保留 2017-12-30 的 Angular 5 學習筆記內容,並補上 GEO 結構、answer blocks、FAQ 與站內延伸閱讀。
關於作者 {#author}
Claire Chang | 企業 AI 導入與流程轉型顧問。專注於 AI Agent 架構設計、ERP 系統整合與企業 AI 治理。
首次發布:2017-12-30