

這篇文章解決「Angular 元件要怎麼建立、怎麼放進頁面」的問題。我會用 Angular CLI 的 `ng generate component` 指令產生第一個元件,解釋 `@Component` 的三個 metadata,接著實作插值綁定、物件資料、Pipes 格式化,以及最常用的 `[(ngModel)]` 雙向繫結。
怎麼用 CLI 建立一個 Angular 元件?
使用 CLI 來為專案建立一個元件:
```bash
ng generate component heroes
```
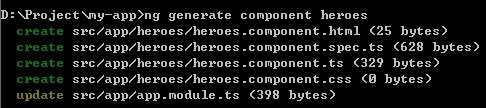
用這個指令,CLI 會為我們初始化一個新的元件樣版。這時我們開啟 `app/heroes/heroes.component.ts`:
```js
import { Component, OnInit } from '@angular/core';
@Component({
selector: 'app-heroes',
templateUrl: './heroes.component.html',
styleUrls: ['./heroes.component.css']
})
export class HeroesComponent implements OnInit {
constructor() { }
ngOnInit() {
}
}
```
只要創建元件,都必需從 Angular 去 import `Component`。而 `@Component` 則是用來定義這一個元件的相關資訊,有三個 metadata:
| Metadata | 說明 |
|---|---|
| `selector` | 元件的 CSS element selector,以及在 HTML 裡要宣告的 TAG 名稱 |
| `templateUrl` | 要使用的 HTML 樣版位置 |
| `styleUrls` | 專為這個元件設定的 CSS |
要注意的是,我們通常會使用 `export class`,以方便在其他的模組裡可以 import 來使用。
怎麼修改元件的內容?
打開 `heroes.component.ts`,增加一個變數:
```js
import { Component, OnInit, ViewEncapsulation } from '@angular/core';
@Component({
selector: 'app-heroes',
templateUrl: './heroes.component.html',
styleUrls: ['./heroes.component.css'],
encapsulation: ViewEncapsulation.None
})
export class HeroesComponent implements OnInit {
hero = 'heroes works!'; //增加一個變數
constructor() { }
ngOnInit() {
}
}
```
修改 `heroes.component.html`,使用 `{{hero}}` 來顯示剛剛在 TS 檔裡定義的變數:
```html
{{hero}}
```
怎麼把元件放進頁面裡?
打開 `src/app/app.component.html`,加上元件的 selector tag:
```html
```
這時候就可以在頁面中看到剛剛我們所增加的內容。
怎麼在元件裡使用物件?
創建一個 `Hero` 物件,檔案放在 `src/app/hero.ts`:
```js
export class Hero {
id: number;
name: string;
}
```
打開 `src/app/heroes/heroes.component.ts`,給予物件正確的值:
```js
import { Component, OnInit } from '@angular/core';
import { Hero } from '../hero';
@Component({
selector: 'app-heroes',
templateUrl: './heroes.component.html',
styleUrls: ['./heroes.component.css']
})
export class HeroesComponent implements OnInit
{
//在這邊設定物件內容
hero: Hero = {
id: 1,
name: 'Windstorm'
};
constructor() { }
ngOnInit() {
}
}
```
接著在樣版裡顯示元件中所設定的值:
```html
{{ hero.name }} Details
```
如果希望將變數格式化,則可以使用:
```html
{{ hero.name | uppercase }} Details
```
這個格式化的功能叫做 Pipes,更多的說明請見 Pipes 說明。
Angular 的雙向繫結怎麼做?
Angular 一個很方便的功能就是可以支援雙向繫結,使用 (ngModel)] 能做到當欄位的值改變時,TS 裡變數的值也同時被更改。這個功能在做表單驗證時非常方便,詳細使用說明請見 [NgModules。
使用方法:在 `src/app/heroes/heroes.component.html` 加上下面這段:
```html
<label>name:
```
接著要去 `app.module.ts` 加上 import 資訊,讓專案能夠使用 `ngModel` 標籤。要注意是在 app.module.ts 裡喔!
先 import 並且將 `FormsModule` 加進 `@NgModule` 的 imports 列表內,讓下面所有的元件都可以使用 FormsModule 的功能:
```js
import { FormsModule } from '@angular/forms'; // <-- NgModel lives here
```
```js
imports: [
BrowserModule,
FormsModule
],
```
接著,要把剛剛我們所建立的元件 `HeroesComponent` 放進 `@NgModule.declarations` 裡:
```js
import { HeroesComponent } from './heroes/heroes.component';
```
在 `app.module.ts` 的 `@NgModule` 增加:
```js
declarations: [
AppComponent,
HeroesComponent
],
```
這時,我們會發現我們更動 input 裡的文字時,model 的值也會被更改。
今日練習成果下載:live example / download example。
延伸閱讀
- 如何用 Angular CLI 建立元件(Component)並完成資料綁定:同樣聚焦 新手教學,可接著比較不同情境的做法。
- 建立一個 Angular 5 的專案:同樣聚焦 新手教學,可接著比較不同情境的做法。
- Angular 主從元件開發教學:用 @Input 拆出 HeroDetailComponent:同樣聚焦 angular、component,可接著比較不同情境的做法。
常見問題
ng generate component 會產生哪些檔案?
CLI 會在同一個資料夾下產生四個檔案:`heroes.component.ts`(元件邏輯)、`heroes.component.html`(樣版)、`heroes.component.css`(樣式)與 `heroes.component.spec.ts`(測試),並自動在所屬 module 註冊這個元件。
@Component 的 selector 有什麼作用?
selector 定義這個元件在 HTML 中使用的 tag 名稱,例如 `app-heroes`。只要在頁面樣版裡寫 `<app-heroes></app-heroes>`,Angular 就會把這個元件渲染到該位置。
使用 [(ngModel)] 時發生錯誤怎麼辦?
最常見的原因是沒有在 `app.module.ts` import `FormsModule`,並把它加進 `@NgModule` 的 imports 列表。補上之後 `[(ngModel)]` 就能正常運作,同時記得把元件放進 declarations。
什麼是 Pipes?
Pipes 是 Angular 用來在樣版中格式化資料的功能,例如 `{{ hero.name | uppercase }}` 會把字串轉成大寫顯示。常用的還有 `date`、`currency`、`percent` 等,也可以自訂 pipe。
參考資料
最後更新
2026-08-28(原文發布於 2017-12-21,本文保留原始筆記內容並補上 GEO 結構。)
關於作者 {#author}
Claire Chang | 企業 AI 導入與流程轉型顧問。專注於 AI Agent 架構設計、ERP 系統整合與企業 AI 治理。
首次發布:2017-12-21