

TensorFlow Object Detection API 訓練自己的資料集,核心流程是四步:用 labelImg 標記圖片、把標籤轉成 TFRecord 格式、修改 pipeline.config 指向自己的資料,最後跑 model_main_tf2.py 開始訓練。以下記錄我實際跑一輪的每個步驟,包含容易卡住的路徑設定和標籤檔案格式。
怎麼標記訓練圖片?用 labelImg
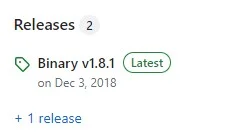
自己收集的圖片要先標出物件的邊界框(bounding box)才能拿去訓練,這一步我用 labelImg。到 labelImg 的 GitHub 下載 release 版本就能直接執行,不用自己編譯。
打開之後介面長這樣,左側是操作按鈕(開圖、換資料夾、上一張下一張、存檔),右上是這張圖目前標好的類別清單,右下是整個資料夾的檔案列表:
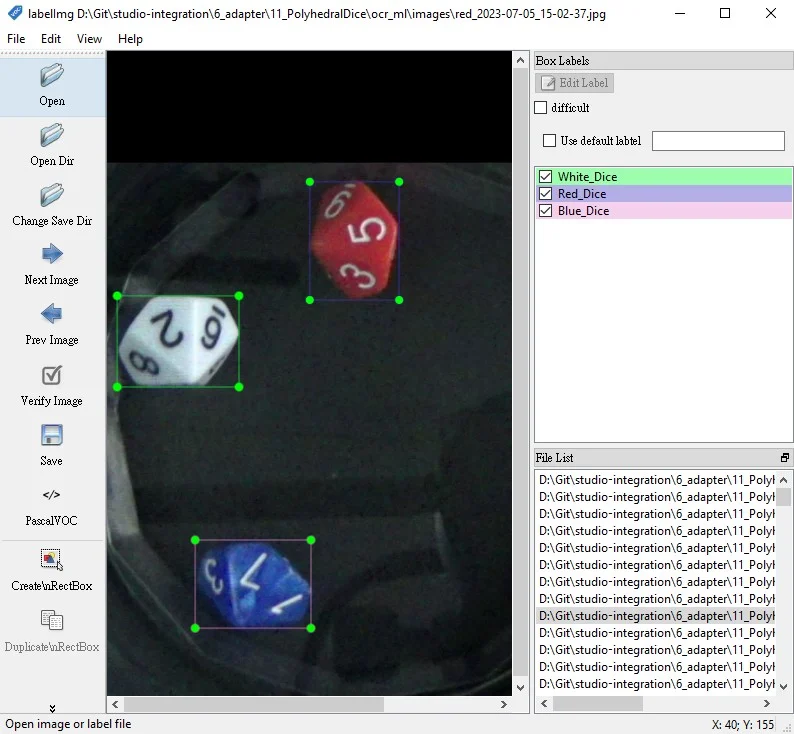
每張圖框好物件、填上類別名稱後存檔,預設會存成 PascalVOC 格式的 XML,這也是後面轉 TFRecord 時要讀的標籤格式。
訓練自訂物件偵測模型的完整步驟是什麼?
從標記完的圖片到能用的模型,中間大致是六個階段:
- 資料準備:把圖像和標籤轉換成 TensorFlow 訓練用的格式,也就是 TFRecord。沒有現成 TFRecord 的話,要用
tf.Example把每張圖的圖像資料、邊界框、類別都包進去。 - 下載並選擇模型:從 TensorFlow Object Detection API 的模型 zoo 下載一個預訓練模型,我這次用的是 SSD MobileNet V2 FPNLite 640x640,它已經在 COCO 資料集上訓練過,拿來微調速度會快很多。
- 修改配置文件:每個模型都會附一份
pipeline.config,裡面定義了模型架構、輸入尺寸、訓練策略等等。至少要改num_classes(你的類別數量)、input_path和label_map_path(指向你的訓練/驗證資料)。 - 訓練模型:用
model_main_tf2.py,帶上pipeline_config_path和model_dir兩個參數開始訓練。 - 評估模型:一樣用
model_main_tf2.py,改成帶checkpoint_dir指向訓練產生的檢查點目錄,就能跑評估。 - 導出模型:滿意結果之後,用
exporter_main_v2.py把訓練好的權重導出成可以拿去推論的圖模型。
怎麼把圖片和標籤轉換成 TFRecord 格式?
這一步最容易卡住,因為每個人的標籤格式(XML、CSV、JSON⋯)都不一樣,寫轉換程式時要自己對應。下面是我實際用的骨架,重點是 create_tf_example 這個函式,它把單張圖片和它的標註打包成一筆 tf.Example:
import os
import tensorflow as tf
from object_detection.utils import dataset_util, label_map_util

# 適應你的標籤。標籤字典應該映射類別名稱到整數ID。
labels_path = 'path_to_your_labels.pbtxt'
label_map = label_map_util.load_labelmap(labels_path)
categories = label_map_util.convert_label_map_to_categories(label_map, max_num_classes=90)
category_index = label_map_util.create_category_index(categories)

def create_tf_example(image_path, annotations_list):
    # 從圖像檔案讀取數據並將其轉換為tf.Example。

    img_data = tf.io.gfile.GFile(image_path, 'rb').read()
    img = Image.open(image_path)
    width, height = img.size

    filename = image_path.encode('utf8')
    image_format = b'jpeg'  # or b'png'

    xmins = []  # List of normalized left x coordinates in bounding box (1 per box)
    xmaxs = []  # List of normalized right x coordinates in bounding box (1 per box)
    ymins = []  # List of normalized top y coordinates in bounding box (1 per box)
    ymaxs = []  # List of normalized bottom y coordinates in bounding box (1 per box)
    classes_text = []  # List of string class name of bounding box (1 per box)
    classes = []  # List of integer class id of bounding box (1 per box)

    for ann in annotations_list:
        xmins.append(float(ann['xmin']) / width)
        xmaxs.append(float(ann['xmax']) / width)
        ymins.append(float(ann['ymin']) / height)
        ymaxs.append(float(ann['ymax']) / height)
        classes_text.append(ann['class'].encode('utf8'))
        classes.append(category_index[ann['class']]['id'])

    tf_example = tf.train.Example(features=tf.train.Features(feature={
        'image/height': dataset_util.int64_feature(height),
        'image/width': dataset_util.int64_feature(width),
        'image/filename': dataset_util.bytes_feature(filename),
        'image/source_id': dataset_util.bytes_feature(filename),
        'image/encoded': dataset_util.bytes_feature(img_data),
        'image/format': dataset_util.bytes_feature(image_format),
        'image/object/bbox/xmin': dataset_util.float_list_feature(xmins),
        'image/object/bbox/xmax': dataset_util.float_list_feature(xmaxs),
        'image/object/bbox/ymin': dataset_util.float_list_feature(ymins),
        'image/object/bbox/ymax': dataset_util.float_list_feature(ymaxs),
        'image/object/class/text': dataset_util.bytes_list_feature(classes_text),
        'image/object/class/label': dataset_util.int64_list_feature(classes),
    }))
    return tf_example

writer = tf.io.TFRecordWriter('path_to_output.tfrecord')

# 適應你的圖像路徑和標籤。
images_path = 'path_to_your_images'
annotations_path = 'path_to_your_annotations'

for image_file in os.listdir(images_path):
    image_path = os.path.join(images_path, image_file)
    annotation_path = os.path.join(annotations_path, image_file.replace('.jpg', '.xml'))

    # 讀取標籤檔案並解析標籤。你可能需要根據你的標籤格式調整這個。
    with open(annotation_path) as f:
        annotation_xml = f.read()
    annotations = parse_annotations(annotation_xml)  # 這個函數根據你的標籤格式。

    tf_example = create_tf_example(image_path, annotations)
    writer.write(tf_example.SerializeToString())

writer.close()
跑完這段之後會產出 path_to_output.tfrecord,拿到 object detection 底下新建一個資料夾放好即可。
label_map.pbtxt 裡的 name 欄位要填什麼?
準備分類設定檔案 *.pbtxt 時,可以參考 \models\research\object_detection\data 底下內建的 mscoco_label_map.pbtxt,格式長這樣:
item {
  name: "/m/01g317"
  id: 1
  display_name: "person"
}
item {
  name: "/m/0199g"
  id: 2
  display_name: "bicycle"
}
item {
  name: "/m/0k4j"
  id: 3
  display_name: "car"
}
...
這裡的 /m/01g317 是 Google Knowledge Graph 裡的專屬識別碼,代表 "person" 這個概念,Google 用這套系統儲存數以億計的實體並互相連結,藉此提升搜尋結果的準確度。
但如果你的專案跟 Google Knowledge Graph 完全無關,name 欄位不需要照抄這套 ID。只要保證每個類別的 name 和 id 在你的檔案裡是唯一的,display_name 清楚寫出類別意思(例如骰子偵測就直接寫 white_dice、red_dice),訓練照樣能跑。
pipeline.config 要怎麼指定資料集位置?
pipeline.config 裡有兩個關鍵區塊,train_input_reader 和 eval_input_reader,分別對應訓練和驗證資料:
model {
  // Model settings go here
  ...
}

train_config {
  // Training settings go here
  ...
}

train_input_reader: {
  tf_record_input_reader {
    input_path: "path_to_train.tfrecord"
  }
  label_map_path: "path_to_label_map.pbtxt"
}

eval_config {
  // Evaluation settings go here
  ...
}

eval_input_reader: {
  tf_record_input_reader {
    input_path: "path_to_eval.tfrecord"
  }
  label_map_path: "path_to_label_map.pbtxt"
}
這裡有個踩雷點:input_path 和 label_map_path 要填檔案系統上的絕對路徑,不是相對於 pipeline.config 檔案本身的相對路徑。假設訓練用的 TFRecord 放在 /home/user/dataset/train.tfrecord,就要這樣寫:
train_input_reader: {
  tf_record_input_reader {
    input_path: "/home/user/dataset/train.tfrecord"
  }
  label_map_path: "/path_to/your_label_map.pbtxt"
}
第一次沒注意到這點,路徑寫成相對路徑,訓練腳本直接報 file not found,改成絕對路徑就正常了。
訓練指令怎麼下?
資料、標籤、config 都準備好之後,訓練指令只有一行:
python models/research/object_detection/model_main_tf2.py \
    --pipeline_config_path=path_to_your_pipeline.config \
    --model_dir=path_to_output_model_dir \
    --alsologtostderr
pipeline_config_path 指向改好的 config 檔,model_dir 是訓練過程中檢查點和日誌要存放的資料夾。訓練跑起來後,同一個 model_dir 也可以拿來做評估,只要把 model_main_tf2.py 的參數換成 checkpoint_dir 即可。
常見問題
一定要用 SSD MobileNet V2 FPNLite 嗎?
不一定,這是模型 zoo 裡眾多預訓練模型的其中一個,選它是因為模型小、推論快,適合先跑通整套流程。要追求精度可以換模型 zoo 裡更大的模型,只是訓練和推論時間都會拉長。
TFRecord 檔案一定要自己寫轉換程式嗎?
如果標籤是 labelImg 存出來的 PascalVOC XML,TensorFlow Object Detection API 的 repo 裡通常有現成的 create_pascal_tf_record.py 之類的轉換腳本可以參考,不用整段從零寫,但欄位對應(尤其是 bounding box 座標要不要正規化)還是得對照自己的標籤格式檢查一次。
label_map 的 id 可以從 0 開始嗎?
不行,TensorFlow Object Detection API 的 id 是從 1 開始編號,0 保留給背景類別。
參考資料
- TensorFlow Models 官方 GitHub repo,Object Detection API 說明文件,存取日期:2026-08-27。https://github.com/tensorflow/models/tree/master/research/object_detection
- TensorFlow Models 官方 GitHub repo,TF2 Detection Model Zoo(含 SSD MobileNet V2 FPNLite),存取日期:2026-08-27。https://github.com/tensorflow/models/blob/master/research/object_detection/g3doc/tf2_detection_zoo.md
延伸閱讀
- 物體偵測技術介紹:Bounding Box、類別分類與常見模型架構:同樣聚焦 物體偵測、電腦視覺,可接著比較不同情境的做法。
- YOLOv8 物件偵測模型介紹:安裝、預測、訓練與輸出流程:同樣聚焦 物體偵測、電腦視覺,可接著比較不同情境的做法。
- TensorFlow Object Detection API 功能介紹與模型選擇:同樣聚焦 TensorFlow、物體偵測,可接著比較不同情境的做法。
關於作者
Claire Chang | 企業 AI 導入與流程轉型顧問。專注於 AI Agent 架構設計、ERP 系統整合與企業 AI 治理。
首次發布:2023-07-28