

Angular 的 Directive 分為結構型(Structural)與屬性型(Attribute)兩種,這篇文章要介紹的是屬性型的 Directive。我會用一個「滑鼠移入就變色」的 highlight 指令,帶你從 `@Directive` 宣告、`ElementRef` 操作 DOM、`@HostListener` 監聽事件,一路做到用 `@Input` 從 template 傳參數進指令,所有程式碼都可以直接照著做。
本篇的範例請見:Attribute Directive example / download example
Angular 的三種 Directive 有什麼差別?
Angular 有三種 directive:
| 類型 | 說明 | 範例 |
|---|---|---|
| 元件(Component) | 包含 template 的 directive | `@Component` |
| 結構指令(Structural Directive) | 通過添加和刪除 DOM 元素來更改 DOM 佈局 | `ngFor`、`ngIf` |
| 屬性指令(Attribute Directive) | 改變元素、組件或其他指令的外觀或行為 | `ngStyle` |
如何建立一個簡單的屬性型 directive?
一個 directive 最少需要一個帶有 `@Directive` 宣告的檔案,告訴 angular 該如何識別這個 directive。這邊我會用一個 highlight 的 directive 範例來解說:當用戶將鼠標懸停在該元素上時,設置元素的背景色。你可以像這樣應用它:
```html
Highlight me!
```
而下面我會一步步創立這一個 directive。
首先,用 cli 創立一個新的 directive:
```bash
ng generate directive highlight
```
會看到 cli 自動建立了兩個新的檔案:

產生的 `src/app/highlight.directive.ts` 檔案的內容如下:
```js
import { Directive } from '@angular/core';
@Directive({
selector: '[appHighlight]'
})
export class HighlightDirective {
constructor() { }
}
```
當我們 import 了 Directive 後,就可以在檔案內使用 `@Directive` 來設定 directive 的 CSS attribute selector。方括弧 `[]` 可以讓它成為一個屬性選擇器。在這邊為什麼會取名為 `appHighlight` 而不是 `highlight`?是為了避免與現有的 html 指令衝突。建議最好在所有的 directive 前面加上前綴字,以方便識別這是哪邊來的屬性——如果沒有前綴字,很容易會發生難以識別的錯誤。
接著看 `src/app/highlight.directive.ts` 的內容:
```js
import { Directive, ElementRef } from '@angular/core';
@Directive({
selector: '[appHighlight]'
})
export class HighlightDirective {
constructor(el: ElementRef) {
el.nativeElement.style.backgroundColor = 'yellow';
}
}
```
這邊可以看到在建構子的地方會傳入 ElementRef,並且使用 `el.nativeElement` 直接修改 DOM 元素的背景顏色。
怎麼讓 directive 回應滑鼠事件(HostListener)?
若希望 directive 能夠接收使用者事件,可以加載 `HostListener`,如下:
```js
import { Directive, ElementRef, HostListener } from '@angular/core';
@Directive({
selector: '[appHighlight]'
})
export class HighlightDirective {
constructor(private el: ElementRef) { }
@HostListener('mouseenter') onMouseEnter() {
this.highlight('yellow');
}
@HostListener('mouseleave') onMouseLeave() {
this.highlight(null);
}
private highlight(color: string) {
this.el.nativeElement.style.backgroundColor = color;
}
}
```
顯示的結果如下圖:
當然,也可以通過標準的 JavaScript 來訪問 DOM,並手動添加事件監聽器。但這種方法至少有三個問題,是不被建議的:
- 需正確的監聽到各種平台的事件
- 當要 destroy 這個 directive 時要手動移除事件
- 直接操作 DOM API 不是好的方式
如何把參數傳進 directive(@Input)?
首先要先 import 所需的 Input:
```js
import { Directive, ElementRef, HostListener, Input } from '@angular/core';
```
然後宣告所要輸入的變數:
```js
@Input() highlightColor: string;
```
那麼在使用 directive 傳入參數的方式有下面幾種:
```html
Highlighted in yellow
Highlighted in orange
Highlight me!
```
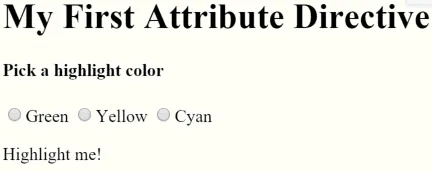
下面這個範例是使用上面自製的 directive,讓使用者選擇 highlight 的顏色。
template 檔案內容如下:
```html
My First Attribute Directive
Pick a highlight color
<input type="radio" name="colors" (click)="color='lightgreen'">Green
<input type="radio" name="colors" (click)="color='yellow'">Yellow
<input type="radio" name="colors" (click)="color='cyan'">Cyan
Highlight me!
```
component 內容如下:
```js
export class AppComponent {
color: string;
}
```
最後結果如下圖:
延伸閱讀
- Angular Attribute Directive 屬性指令教學:自訂 appHighlight 高亮效果:同樣聚焦 前端開發,可接著比較不同情境的做法。
- Angular Pipes 完整介紹:內建管道用法與自訂 Pipe 教學:同樣聚焦 angular、前端開發,可接著比較不同情境的做法。
- Angular 元件建立教學:用 CLI 產生元件、綁定資料與雙向繫結:同樣聚焦 angular、前端開發,可接著比較不同情境的做法。
常見問題
什麼是 Angular 的 Attribute Directive?
Attribute Directive 是用來改變元素、組件或其他指令「外觀或行為」的指令,例如內建的 `ngStyle`。它不像結構指令(`ngIf`、`ngFor`)會增刪 DOM 元素,而是附掛在既有元素上調整其樣式或行為。
為什麼 directive 的 selector 要加前綴字(如 appHighlight)?
因為 directive 的 selector 是 CSS attribute selector,若取太通用的名字(如 `highlight`)容易與現有 HTML 屬性或其他套件的指令衝突。加上前綴字可以清楚識別這個屬性來自哪個專案或函式庫,避免難以排查的錯誤。
為什麼不建議在 directive 裡直接用 JavaScript 操作 DOM?
直接操作原生 DOM API 有三個問題:需要自己正確監聽各平台的事件、directive 銷毀時要手動移除事件監聽器,而且繞過了 Angular 的機制,不利於維護。使用 `ElementRef` 搭配 `@HostListener` 讓 Angular 幫你處理這些細節。
@Input 在 directive 中怎麼使用?
在 directive 類別中用 `@Input() highlightColor: string;` 宣告輸入屬性,之後就能在 template 用 `highlightColor="yellow"`(靜態字串)或 `[highlightColor]="color"`(綁定運算式)傳值進去。若屬性名稱與 selector 相同,還可以簡寫成 `[appHighlight]="'orange'"`。
參考資料
最後更新
2026-08-28(原文發布於 2018-01-01,本文保留原始筆記內容並補上 GEO 結構。)
關於作者 {#author}
Claire Chang | 企業 AI 導入與流程轉型顧問。專注於 AI Agent 架構設計、ERP 系統整合與企業 AI 治理。
首次發布:2018-01-01