
OpenCV 圖片降維常見流程是先把彩色圖片轉成灰階,再用 threshold 轉成黑白二值圖。灰階降低色彩維度,二值化則把像素分成前景與背景,方便後續偵測、分割與形狀分析。
OpenCV 如何把彩色圖片轉灰階?
OpenCV 使用 `cv2.cvtColor()` 做色彩空間轉換。彩色轉灰階時,輸出只保留亮度資訊,能減少後續影像處理的資料量。
偵測顏色時,常把 BGR 轉成 HSV:
```python
imageHSV = cv2.cvtColor(image, cv2.COLOR_BGR2HSV)
```
若要降為灰階,可使用:
```python
imageGray = cv2.cvtColor(image, cv2.COLOR_RGB2GRAY)
```
若圖片是用 `cv2.imread()` 讀入,OpenCV 預設通道順序是 BGR,常見寫法會是:
```python
imageGray = cv2.cvtColor(image, cv2.COLOR_BGR2GRAY)
```
OpenCV 如何把灰階圖片轉黑白?
灰階轉黑白的核心是閾值。像素值小於閾值時設為 0,像素值大於閾值時設為最大值 255。
OpenCV 提供兩類常用方法:
- `cv.threshold()`:使用全域閾值。
- `cv.adaptiveThreshold()`:依照局部區域自動計算閾值。
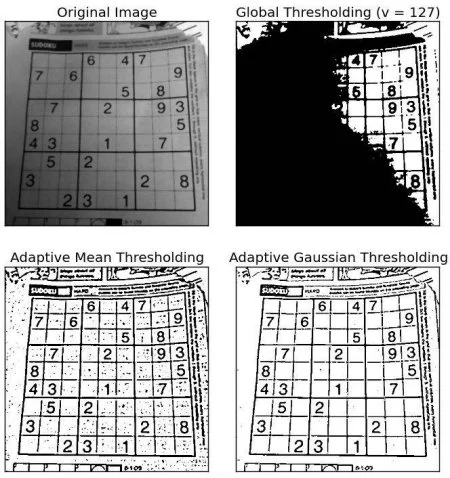
全域閾值適合光照均勻的圖片。自適應閾值適合不同區域亮度差異明顯的圖片,例如文件掃描、棋盤或陰影場景。
cv.threshold 怎麼使用?
`cv.threshold()` 用固定閾值處理整張灰階圖。這種方法簡單、速度快,但對光照不均的圖片較敏感。
範例:
```python
import cv2 as cv
from matplotlib import pyplot as plt
img = cv.imread('gradient.png', 0)
ret, thresh1 = cv.threshold(img, 127, 255, cv.THRESH_BINARY)
ret, thresh2 = cv.threshold(img, 127, 255, cv.THRESH_BINARY_INV)
ret, thresh3 = cv.threshold(img, 127, 255, cv.THRESH_TRUNC)
ret, thresh4 = cv.threshold(img, 127, 255, cv.THRESH_TOZERO)
ret, thresh5 = cv.threshold(img, 127, 255, cv.THRESH_TOZERO_INV)
titles = ['Original Image', 'BINARY', 'BINARY_INV', 'TRUNC', 'TOZERO', 'TOZERO_INV']
images = [img, thresh1, thresh2, thresh3, thresh4, thresh5]
for i in range(6):
plt.subplot(2, 3, i + 1)
plt.imshow(images[i], 'gray', vmin=0, vmax=255)
plt.title(titles[i])
plt.xticks([])
plt.yticks([])
plt.show()
```
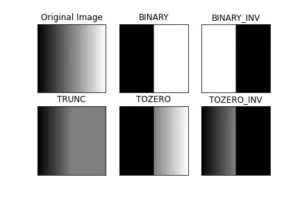
常見 threshold 類型:
| 類型 | 用途 |
|---|---|
| `THRESH_BINARY` | 大於閾值變 255,小於閾值變 0 |
| `THRESH_BINARY_INV` | `THRESH_BINARY` 的反向 |
| `THRESH_TRUNC` | 大於閾值者截斷為閾值 |
| `THRESH_TOZERO` | 小於閾值者變 0 |
| `THRESH_TOZERO_INV` | 大於閾值者變 0 |
cv.adaptiveThreshold 適合什麼情境?
`cv.adaptiveThreshold()` 適合處理光照不均的圖片。OpenCV 會根據像素周圍小區域計算不同閾值,讓不同亮度區域都能得到較好的二值化結果。
`adaptiveMethod` 常見選項:
- `cv.ADAPTIVE_THRESH_MEAN_C`:閾值為鄰域平均值減去常數 C。
- `cv.ADAPTIVE_THRESH_GAUSSIAN_C`:閾值為鄰域高斯加權和減去常數 C。
- `blockSize`:決定鄰域區域大小。
- `C`:從鄰域平均值或加權總和中減去的常數。
範例:
```python
import cv2 as cv
from matplotlib import pyplot as plt
img = cv.imread('sudoku.png', 0)
img = cv.medianBlur(img, 5)
ret, th1 = cv.threshold(img, 127, 255, cv.THRESH_BINARY)
th2 = cv.adaptiveThreshold(
img, 255, cv.ADAPTIVE_THRESH_MEAN_C, cv.THRESH_BINARY, 11, 2
)
th3 = cv.adaptiveThreshold(
img, 255, cv.ADAPTIVE_THRESH_GAUSSIAN_C, cv.THRESH_BINARY, 11, 2
)
titles = [
'Original Image',
'Global Thresholding (v = 127)',
'Adaptive Mean Thresholding',
'Adaptive Gaussian Thresholding',
]
images = [img, th1, th2, th3]
for i in range(4):
plt.subplot(2, 2, i + 1)
plt.imshow(images[i], 'gray')
plt.title(titles[i])
plt.xticks([])
plt.yticks([])
plt.show()
```
Otsu 二值化如何自動找閾值?
Otsu 方法會根據圖片直方圖自動尋找最佳全域閾值。當圖片具有雙峰分布時,Otsu 常比手動指定 127 更穩定。
範例:
```python
import cv2 as cv
import matplotlib.pyplot as plt
img = cv.imread('noisy2.png', 0)
ret1, th1 = cv.threshold(img, 127, 255, cv.THRESH_BINARY)
ret2, th2 = cv.threshold(img, 0, 255, cv.THRESH_BINARY + cv.THRESH_OTSU)
blur = cv.GaussianBlur(img, (5, 5), 0)
ret3, th3 = cv.threshold(blur, 0, 255, cv.THRESH_BINARY + cv.THRESH_OTSU)
```
若圖片有雜訊,先用 Gaussian blur 降噪,再套 Otsu,常能改善結果。本文的實務判斷是:先試全域閾值,再試自適應閾值;若圖片有明顯雙峰分布,再用 Otsu 減少手動調參。
常見問題
OpenCV 彩色轉灰階要用 RGB2GRAY 還是 BGR2GRAY?
如果圖片是用 OpenCV `cv2.imread()` 讀入,通常要用 `cv2.COLOR_BGR2GRAY`。如果圖片來源是 RGB 陣列,才使用 `cv2.COLOR_RGB2GRAY`。
threshold 的 ret 是什麼?
`cv.threshold()` 回傳的 `ret` 是使用的閾值。若使用 Otsu,`ret` 會是 OpenCV 自動計算出的最佳閾值。
adaptiveThreshold 的 blockSize 怎麼選?
`blockSize` 必須是大於 1 的奇數。可先從 11、15、21 這類值試起,再依圖片細節與光照變化調整。
Otsu 方法適合所有圖片嗎?
Otsu 方法不適合所有圖片。Otsu 最適合前景與背景在直方圖上能形成明顯雙峰的圖片。
二值化前一定要先轉灰階嗎?
多數 OpenCV 二值化流程會先轉灰階。若要依顏色分割,則可先轉 HSV,再用 `cv.inRange()` 建立遮罩。
參考資料
- OpenCV Thresholding 教學:https://docs.opencv.org/4.x/d7/d4d/tutorial_py_thresholding.html
- OpenCV Color Conversions:https://docs.opencv.org/4.x/d8/d01/groupimgproccolorconversions.html
最後更新
Fri Dec 16 2022 08:00:00 GMT+0800 (Taiwan Standard Time)
延伸閱讀
關於作者 {#author}
Claire Chang | 企業 AI 導入與流程轉型顧問。專注於 AI Agent 架構設計、ERP 系統整合與企業 AI 治理。
首次發布:2022-12-16