

PixiJS 連連看遊戲的開始、結束與過關畫面,可以用一個預設隱藏的 `Container` 當作覆蓋層,再透過事件切換文字與顯示狀態。這篇保留 2018 年連連看遊戲開發筆記的實作方式,重點放在 `PIXI.Text`、`GameRoundEnd` 類別、`EventEmitter` 流程,以及「過關、逾時、無路可走」三種結局的判斷。
PixiJS 連連看為什麼需要結束與過關畫面?
PixiJS 連連看需要結束與過關畫面,因為玩家完成盤面、時間用完或盤面無路可走時,都需要清楚知道目前局面,並能重新開始遊戲。
每個遊戲一般都會需要關卡的概念,也就是過關後可以再重新進行遊戲,並且需要有關卡結局畫面。這個連連看版本要做的,就是一個可在過關或遊戲結束時出現的覆蓋畫面。
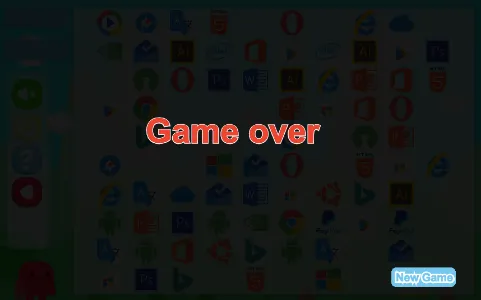
這個畫面不需要拆成獨立頁面。用 PixiJS 製作時,可以把結束畫面做成一個 `Container`,平常設定 `visible = false`,等遊戲流程送出事件時再顯示。這樣盤面、音效、提示與重新開始按鈕都仍然留在同一個遊戲流程裡。
PixiJS 內要怎麼使用文字?
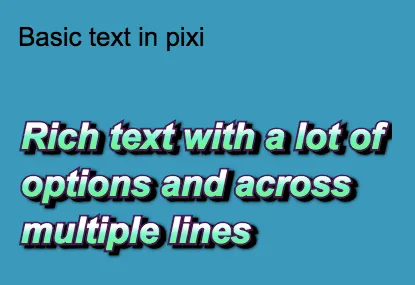
PixiJS 4.0 之後可以直接用 `PIXI.Text` 和 `PIXI.TextStyle` 做文字效果。一般文字、漸層填色、外框、陰影與自動換行都能在 canvas 裡完成。
以下是 PixiJS 官方文字範例的寫法,先建立 `PIXI.Text`,再把文字物件加入 `app.stage`:
```js
var app = new PIXI.Application(800, 600, {backgroundColor: 0x1099bb});
document.body.appendChild(app.view);
var basicText = new PIXI.Text('Basic text in pixi');
basicText.x = 30;
basicText.y = 90;
app.stage.addChild(basicText);
var style = new PIXI.TextStyle({
fontFamily: 'Arial',
fontSize: 36,
fontStyle: 'italic',
fontWeight: 'bold',
fill: ['#ffffff', '#00ff99'], // gradient
stroke: '#4a1850',
strokeThickness: 5,
dropShadow: true,
dropShadowColor: '#000000',
dropShadowBlur: 4,
dropShadowAngle: Math.PI / 6,
dropShadowDistance: 6,
wordWrap: true,
wordWrapWidth: 440
});
var richText = new PIXI.Text('Rich text with a lot of options and across multiple lines', style);
richText.x = 30;
richText.y = 180;
app.stage.addChild(richText);
```
成果如下:
PixiJS BitmapText 適合用在遊戲文字嗎?
PixiJS BitmapText 適合用在大量或固定樣式的遊戲文字,因為 Bitmap font 會把字型預先轉成貼圖,再由 PixiJS 顯示文字內容。
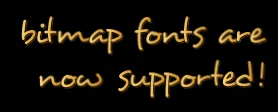
PixiJS 也支援 Bitmap font。下面是 PixiJS 官方 demo 的概念:先載入 WebFont,再載入 `desyrel.xml`,最後用 `PIXI.extras.BitmapText` 建立文字。
```js
var app = new PIXI.Application();
document.body.appendChild(app.view);
// // Load them google fonts before starting...!
window.WebFontConfig = {
google: {
families: ['Snippet', 'Arvo:700italic', 'Podkova:700']
},
active: function() {
// do something
init();
}
};
// include the web-font loader script
/ jshint ignore:start /
(function() {
var wf = document.createElement('script');
wf.src = ('https:' === document.location.protocol ? 'https' : 'http') +
'://ajax.googleapis.com/ajax/libs/webfont/1/webfont.js';
wf.type = 'text/javascript';
wf.async = 'true';
var s = document.getElementsByTagName('script')[0];
s.parentNode.insertBefore(wf, s);
})();
/ jshint ignore:end /
function init()
{
PIXI.loader
.add('desyrel', 'required/assets/desyrel.xml')
.load(onAssetsLoaded);
function onAssetsLoaded() {
var bitmapFontText = new PIXI.extras.BitmapText('bitmap fonts are\n now supported!', { font: '35px Desyrel', align: 'right' });
bitmapFontText.x = app.screen.width - bitmapFontText.textWidth - 20;
bitmapFontText.y = 20;
app.stage.addChild(bitmapFontText);
}
}
```
顯示成果如下:
在這個連連看結束畫面中,使用一般 `PIXI.Text` 已經足夠,因為畫面上只有結局訊息和 `New Game` 文字。若遊戲後續有分數、倒數、傷害數字或大量動態文字,再考慮把固定樣式改成 Bitmap font。
GameRoundEnd 類別怎麼做結束畫面?
`GameRoundEnd` 類別可以繼承 `PIXI.Container`,用黑色半透明 `Graphics` 畫出遮罩,再放入結局文字與重新開始按鈕。
新增檔案 `GameRoundEnd.ts`,讓結束畫面本身負責三件事:接收遊戲流程事件、顯示不同結局文字、按下 `New Game` 後送出重開事件。平常畫面隱藏,收到過關或失敗事件才顯示。
```ts
import Container = PIXI.Container;
import { eventEmitter } from "../Main";
import { GameFlowEvent } from "../core/Event";
export class GameRoundEnd extends Container {
private text:PIXI.Text;
constructor() {
super();
this.interactive = true;
this.visible = false;
eventEmitter.on(GameFlowEvent.GameEndWithTimeout, ()=>{
this.text.text = "Time is up!";
this.text.x = 260;
this.text.y = 200;
this.visible = true;
});
eventEmitter.on(GameFlowEvent.GameEndWithNoPath, ()=>{
this.text.text = "Game over";
this.text.x = 260;
this.text.y = 200;
this.visible = true;
});
eventEmitter.on(GameFlowEvent.GamePass, ()=>{
this.text.text = "Congratulations! \nYou passed!";
this.text.x = 210;
this.text.y = 200;
this.visible = true;
});
// 黑底
let gt = new PIXI.Graphics();
gt.beginFill(0x000000, 0.9);
gt.drawRect(0,0,860,540);
gt.endFill();
this.addChild(gt);
// 文字
this.text = new PIXI.Text("Congratulations! \nYou passed!", {
fontWeight: 'bold',
fontSize: 60,
fontFamily: 'Arial',
fill: '#ff0000',
align: 'center',
stroke: '#FFFFFF',
strokeThickness: 3
});
this.addChild(this.text);
// 再玩一次按鈕
let btn = new PIXI.Graphics();
btn.beginFill(0x75C7ED);
btn.drawRoundedRect(700,480,115,35,10);
btn.endFill();
btn.buttonMode = true;
btn.interactive = true;
btn.on("mouseup", this.trigger.bind(this));
btn.on("touchend", this.trigger.bind(this));
this.addChild(btn);
let newGame = new PIXI.Text("New Game", {
fontWeight: 'bold',
fontSize: 20,
fontFamily: 'Arial',
fill: '#75C6ED',
align: 'center',
stroke: '#FFFFFF',
strokeThickness: 6
});
newGame.x = 705;
newGame.y = 483;
this.addChild(newGame);
}
public trigger(){
eventEmitter.emit(GameFlowEvent.CreateNewGameRequest);
this.visible = false;
}
}
```
這段實作有一個很實用的模式:結束畫面的狀態不直接檢查棋盤,而是聽 `GameFlowEvent`。盤面邏輯只負責送出「發生了什麼事」,畫面層只負責「要顯示什麼」,後面要換 UI 或加動畫會比較好改。
| 事件 | 畫面文字 | 使用情境 |
|---|---|---|
| `GameEndWithTimeout` | `Time is up!` | 倒數時間結束 |
| `GameEndWithNoPath` | `Game over` | 盤面沒有可消除路徑,且不能再重整 |
| `GamePass` | `Congratulations! You passed!` | 所有圖塊都消除完成 |
| `CreateNewGameRequest` | 隱藏結束畫面 | 玩家按下 New Game |
GameBoard 要怎麼判斷過關或無路可走?
`GameBoard` 可以在兩個圖塊成功連線並消除後,立刻檢查盤面是否清空,或是否已經找不到下一組可消除路徑。
修改 `GameBoard.ts` 內 `iconClickHandler` 的內容如下。這段邏輯會先取消提示、處理第二次選取,再判斷兩張圖是否相同、路徑是否能連線、是否要消除圖塊。成功消除後,才進入過關與僵局判斷。
```ts
let iconClickHandler = ()=>{
this.cancelTips();
if (this.selected) {
let selectCorrect = false;
this.select2 = new Point(x, y);
this.iconSelected(this.select2);
setTimeout(()=>{
if (board.hasSameValue(this.select1, this.select2)) {
if (! (this.select1.x == x && this.select1.y == y) ) {
let path = new Path(this.select1, this.select2, board);
if(path.canLinkInLine()){
this.pathHistory.push(path);
this.valueHistory.push(board.getValue(this.select1));
LinkedLine.instance.drawPath(path);
this.clearIcon(this.select1);
this.clearIcon(this.select2);
eventEmitter.emit(GameFlowEvent.LinkedLineSuccess);
selectCorrect = true;
// 判斷還有沒有路走
if(board.gameRoundEnd()){
eventEmitter.emit(GameFlowEvent.GamePass);
}else if(board.getFirstExistPath() == null){
if(reloadTimes > 0){
this.reloadBoard();
eventEmitter.emit(GameFlowEvent.BoardNeedReload);
}else{
eventEmitter.emit(GameFlowEvent.GameEndWithNoPath);
}
}
}
}
}
if(selectCorrect){
SoundMgr.play('Sound_select_crrect');
}else{
SoundMgr.play('Sound_select_error');
this.iconUnSelected(this.select1);
this.iconUnSelected(this.select2);
}
this.selected = false;
},0);
} else {
this.select1 = new Point(x, y);
this.iconSelected(this.select1);
this.selected = true;
SoundMgr.play('Sound_select_1');
}
};
```
這裡的判斷順序很重要。`board.gameRoundEnd()` 要在成功清除兩張圖之後才檢查,否則盤面狀態還沒更新;`board.getFirstExistPath() == null` 則用來判斷是否無路可走。若還有重整次數,就重整盤面;若沒有重整次數,就送出 `GameEndWithNoPath`。
PixiJS 遊戲流程事件怎麼串起來?
PixiJS 連連看可以把遊戲流程拆成「盤面送事件、畫面聽事件、按鈕再送事件」。這種事件式寫法能降低 `GameBoard` 與 `GameRoundEnd` 之間的耦合。
從這篇筆記看,連連看結局流程可以整理成四個步驟:
- 玩家點兩張圖,`GameBoard` 判斷圖案是否相同。
- `Path.canLinkInLine()` 判斷兩張圖是否能連線消除。
- 成功消除後,`GameBoard` 檢查過關、無路可走或需要重整。
- `GameRoundEnd` 收到 `GamePass`、`GameEndWithTimeout` 或 `GameEndWithNoPath` 後顯示覆蓋畫面。
這份實作的資訊增益,是把連連看結局畫面當成「遊戲流程狀態」來處理,而不是把文字提示散落在點擊邏輯中。小型 H5 遊戲很容易在開發後期把 UI、音效、判斷條件混在同一個函式裡;先用事件分層,之後要加倒數計時、下一關、分數結算或排行榜,都比較不會牽一髮動全身。
今日成果有哪些?
這次完成 PixiJS 連連看遊戲的結束與過關畫面,並把盤面消除後的結果判斷接回遊戲流程事件。
線上 demo:https://claire-chang.com/ironman2018/1109/
今日成果下載:ironman20181109.zip
延伸閱讀
- PixiJS 場景設定教學:Application、Canvas 與自動縮放
- PixiJS 載入素材教學:Loader、Spritesheet 與進度事件
- PixiJS Graphics 連線效果教學:連連看選取框與路徑繪製
- PixiJS 按鈕製作基礎:Sprite 互動、ButtonBase 與靜音切換
- PixiJS 音樂音效設定:PixiJS Sound 與 Howler.js 怎麼選?
常見問題
PixiJS 連連看結束畫面一定要做成獨立場景嗎?
PixiJS 連連看結束畫面不一定要做成獨立場景。小型遊戲可以先用一個 `Container` 當覆蓋層,平常隱藏,需要時再顯示。
PixiJS 過關畫面要用 Sprite 還是 Text?
PixiJS 過關畫面如果只需要顯示文字,用 `PIXI.Text` 就夠了。若過關畫面有完整美術圖、角色動畫或背景,可以再搭配 `Sprite` 和 `AnimatedSprite`。
GameEndWithNoPath 和 GamePass 有什麼不同?
`GamePass` 代表盤面上的圖塊都已經消除完成。`GameEndWithNoPath` 代表盤面還有圖塊,但已經找不到可連線消除的路徑,而且沒有剩餘重整次數。
New Game 按鈕為什麼要送出 CreateNewGameRequest?
`CreateNewGameRequest` 讓結束畫面不用直接建立新盤面。按鈕只送出「玩家想重新開始」這個意圖,真正重開遊戲的流程交給主程式或遊戲流程管理者處理。
PixiJS BitmapText 什麼時候比 Text 更適合?
PixiJS BitmapText 適合固定字型、固定樣式、數量較多或更新頻率高的遊戲文字。單一結局訊息或按鈕文字通常用 `PIXI.Text` 比較直覺。
參考資料
最後更新
2018-11-09(本文保留 2018 年 PixiJS 連連看開發筆記內容,並補上 GEO 結構、FAQ 與站內延伸閱讀。)
關於作者 {#author}
Claire Chang | 企業 AI 導入與流程轉型顧問。專注於 AI Agent 架構設計、ERP 系統整合與企業 AI 治理。
首次發布:2018-11-09