使用者設定
- GitHub Copilot – 一般設定
github.copilot.enable設定在所有檔案啟用 GitHub Copilot 功能,但停用「純文字」檔案類型。github.copilot.editor.enableAutoCompletions設定為true啟用程式碼自動補全功能,也就是 Inline 自動完成功能。因為自動完成功能經常會提供錯誤的提示,有些人會選擇關閉這個選項。github.copilot.editor.enableCodeActions設定為true控制 Copilot 命令在可用時是否顯示為 Code Actions (程式碼動作)github.copilot.renameSuggestions.triggerAutomatically設定為true自動觸發重新命名建議window.commandCenter設定為true如果要啟用chat.commandCenter.enabled設定,就必須啟用這個設定。chat.commandCenter.enabled設定為true設定要不要在編輯器中啟用 Copilot Chat 指令中心按鈕。workbench.commandPalette.experimental.askChatLocation設定為chatView當你按下F1之後詢問Ask GitHub Copilot的結果要顯示在哪裡,選chatView就會留下提問記錄,若選quickChat就不會留下。github.copilot.chat.search.semanticTextResults設定為true在搜尋檢視中啟用語意搜尋結果。
github.copilot.chat.followUps設定為firstOnly或always是否要在聊天中建議跟進訊息,提供你下一個提示的建議。github.copilot.chat.localeOverride設定為zh-TW設定 GitHub Copilot Chat 的回應語言預設為繁體中文github.copilot.chat.useProjectTemplates設定為true使用/new時直接選用 GitHub 專案範本github.copilot.chat.scopeSelection設定為true如果使用者使用/explain並且使用中編輯器沒有選取,是否提示使用者選取特定符號範圍。chat.detectParticipant.enabled設定為true在 Chat View 聊天的時候自動偵測聊天參與者,因此你可以不用特別透過@叫用聊天參與者。如果結果不如預期,可以按下rerun without重跑一次,就會交給 Copilot 來回答。(說明)
github.copilot.chat.temporalContext.enabled設定為true是否要在 Copilot 要求中包含最近檢視及編輯過的檔案。inlineChat.holdToSpeech設定為true按住不放Ctrl+U或Ctrl+I開始語音對話inlineChat.finishOnType設定為false在編輯器中輸入時,不會自動結束 Inline Chat 對話inlineChat.mode設定為preview預設為live,可以選擇preview(先給預覽) 或live(直接寫入) 兩種模式
github.copilot.chat.startDebugging.enabled設定為true在 Chat View 啟用實驗性的/startDebugging命令,幫你快速在 VS Code 初始化偵錯相關設定。
github.copilot.chat.setupTests.enabled設定為true啟用實驗性的/setupTests命令,幫你在 VS Code 快速初始化單元測試相關設定。github.copilot.chat.fixTestFailure.enabled設定為true啟用聊天中的/fixTestFailure命令,並在未發現測試設定時自動委派某些/fix呼叫。github.copilot.chat.generateTests.codeLens設定為true顯示產生測試程式碼 Code Lens 提示,針對目前測試覆蓋範圍資訊未涵蓋的符號。github.copilot.chat.testGeneration.instructions設定為以下內容:"github.copilot.chat.testGeneration.instructions": [ { "file": ".copilot-test-instructions.md" }, { "text": "Always try uniting related tests in a suite." } ],
github.copilot.chat.codeGeneration.useInstructionFiles設定為true使用.github/copilot-instructions.md文件來自訂程式碼生成邏輯github.copilot.chat.codeGeneration.instructions設定為以下內容:"github.copilot.chat.codeGeneration.instructions": [ { "text": "Always response in #zh-tw." }, { "text": "When outputing any text, use the following translation mappings: create = 建立, object = 物件, queue = 佇列, stack = 堆疊, information = 資訊, invocation = 呼叫, code = 程式碼, running = 執行, library = 函式庫, schematics = 原理圖, building = 建構, Setting up = 設定, package = 套件, video = 影片, for loop = for 迴圈, class = 類別, Concurrency = 平行處理, Transaction = 交易, Transactional = 交易式, Code Snippet = 程式碼片段, Code Generation = 程式碼產生器, Any Class = 任意類別, Scalability = 延展性, Dependency Package = 相依套件, Dependency Injection = 相依性注入, Reserved Keywords = 保留字, Metadata = Metadata, Clone = 複製, Memory = 記憶體, Built-in = 內建, Global = 全域, Compatibility = 相容性, Function = 函式, Refresh = 重新整理, document = 文件, example = 範例, demo = 展示, quality = 品質, tutorial = 指南, recipes = 秘訣, byte = 位元組, bit = 位元" }, { "file": ".copilot-instructions.md" } ],github.copilot.chat.reviewSelection.instructions設定為以下內容:"github.copilot.chat.reviewSelection.instructions": [ { "file": ".copilot-review-instructions.md" } ],github.copilot.chat.commitMessageGeneration.instructions設定為以下內容:"github.copilot.chat.commitMessageGeneration.instructions": [ { "file": ".copilot-commit-message-instructions.md" } ],
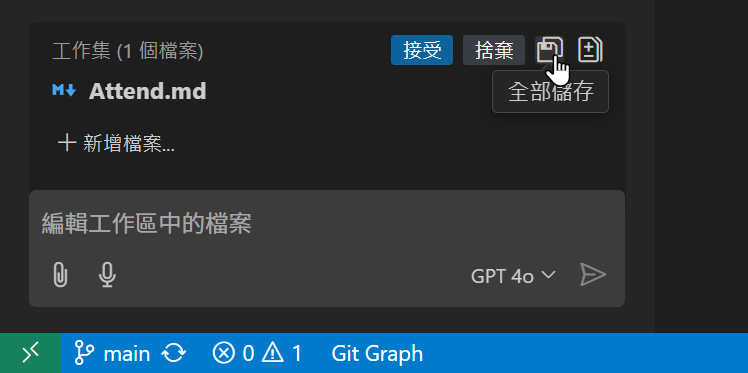
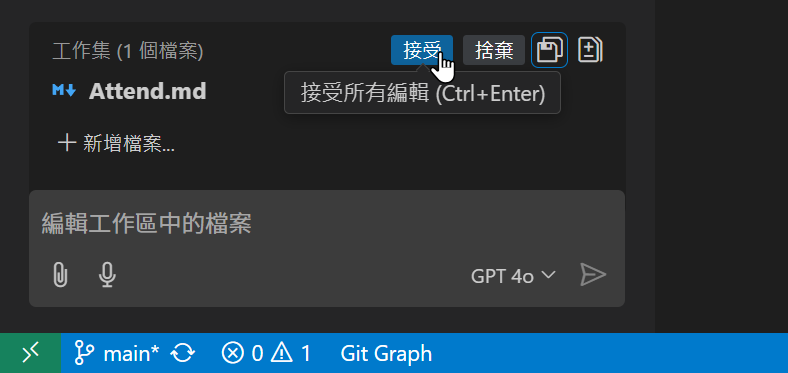
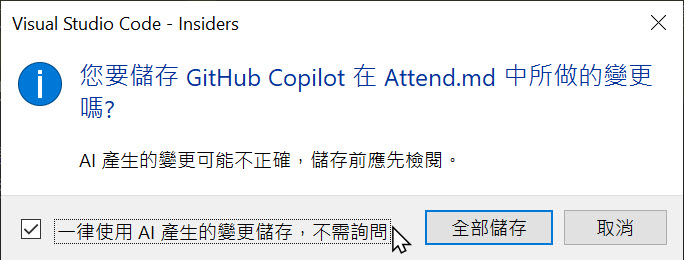
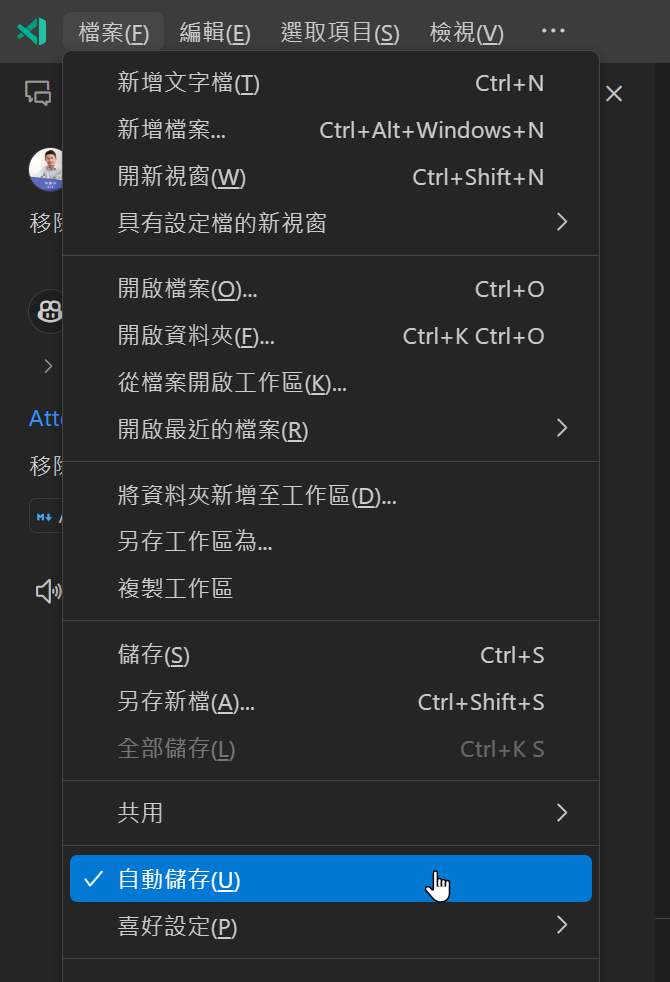
github.copilot.chat.edits.suggestRelatedFilesForTests設定為true該功能會在你編輯程式碼時,建議與測試相關的檔案。這對於開發者來說非常有用,因為它可以幫助你快速找到並編輯與當前程式碼變更相關的測試檔案,從而確保程式碼的品質和可靠性。github.copilot.chat.edits.suggestRelatedFilesFromGitHistory設定為true該功能會根據 Git 歷史紀錄來建議相關的檔案。這意味著當你編輯某個檔案時,GitHub Copilot Chat 會根據過去的 Git 提交紀錄,建議可能與當前編輯相關的其他檔案。這有助於你更全面地理解程式碼變更的影響範圍,並確保所有相關檔案都得到了適當的更新。chat.editing.alwaysSaveWithGeneratedChanges設定為false如果你有用 Copilot Edits 產生程式碼,當你按下「接受」的時候,並不會自動存檔,然而有個 全部儲存(Save All) 的按鈕 (圖一),按下的時候會儲存包含 AI 產生的變更的檔案,但儲存前會先會顯示確認對話框 (圖二),可以幫助你全部儲存。你可以在儲存後,按下「接受」來完成這次編輯 (圖三)。也可以按下「捨棄」復原變更 (圖四),即便你已經按下了儲存,還是可以透過捨棄按鈕還原到編輯前的狀態。以上的行為是預設的,由於很多專案可能會依賴由檔案變更觸發的自動化任務,例如自動建置或測試任務等等,像是dotnet watch或ng serve --watch或webpack或parcel watch都有類似機制。如果自動儲存的話,就可能會不斷觸發這些工具自動觸發。在圖二的對話框中,如果你勾選了「一律使用 AI 產生的變更儲存,不需詢問」選項 (圖五),以後就可以在不詢問確認的情況下永遠儲存檔案。勾選後,原本的「全部儲存」按鈕將會被隱藏。事實上,這個動作會幫你調整chat.editing.alwaysSaveWithGeneratedChanges設定為true。當chat.editing.alwaysSaveWithGeneratedChanges設定為true之後,你下次用 Copilot Edits 編輯檔案,在還沒按下「接受」之前,不會「自動儲存」,即便你在按下「接受」之後,依然不會「自動儲存」。除非你啟用了 VS Code 的[檔案]>[自動儲存]功能 ("files.autoSave": "afterDelay") (圖六),才會真的「自動儲存」喔!chat.editing.confirmEditRequestRemoval設定為true該功能會在你嘗試刪除由 GitHub Copilot Chat 生成的程式碼變更時,提示你確認是否要刪除。這樣可以避免意外刪除程式碼變更,並確保你的程式碼變更是正確的。chat.editing.confirmEditRequestRetry設定為true該功能會在你嘗試重新生成由 GitHub Copilot Chat 生成的程式碼變更時,提示你確認是否要重新生成。這樣可以避免意外重新生成程式碼變更,並確保你的程式碼變更是正確的。
accessibility.voice.speechLanguage設定為zh-TW設定語音輸入的語言為繁體中文。accessibility.voice.autoSynthesize設定為off在 Copilot 回應時自動合成語音,但有時候太吵了,建議關閉!XDaccessibility.voice.keywordActivation設定為chatInContext代表你在說Hey Code時會在 Copilot 聊天視窗互動accessibility.voice.speechTimeout設定為1200設定語音輸入後可停頓的時間為 1200 毫秒accessibility.voice.ignoreCodeBlocks設定為true(Insiders)避免在合成語音的時候去讀程式碼區塊的內容
設定檔案: