Posted on

Starling簡報分享

Starling簡介

  1. 基於Stage3D技術來實作
  2. 在Flash Player 11之後的版本才能支援此技術
  3. 使用GPU做圖形的運算,讓Flash的效能能夠到之前的1000倍(官方說法)!
  4. 易學,使用跟Flash native API類似的類別,方法,架構等,讓原本熟悉Flash的開發者可以很快的上手可發布到多種平台(包括 iOS andAndroid及各種瀏覽器)
    image-712


3D畫面運作原理

  1. Flash原有的坐標系統:Global Point和Local Point
  2. 3D世界的坐標系統:世界坐標到相機坐標的轉換
    201212141827446597-349

3D透視變換方法

  1. 正交投影
    201212141827541985-383
  2. 透視投影
    201212141827559901-404
  3. 比較圖
    201212141827571132-411

Stage3D的渲染過程

VertexShader 主要作用就是3D流程中的前半段操作(對頂點進行一系列的矩陣變換)
FragmentShader:對這些變換後的頂點(及流程中的光柵化部分)進行渲染
螢幕快照-2014-01-30-下午1.03.21-494

過去主要的3D技術

  1. 使用GPU的3D引擎:硬件加速(hardware acceleration)
    1. DirectX
    2. OpenGL
  2. 其他Flash3D引擎:軟件模式(software mode)
    1. Papervision3D
    2. Away3D
    3. Alternativa3D

Starling的渲染方式

螢幕快照-2014-02-01-下午11.37.51-731


剩的請自行看投影片….

Posted on 1 Comment

產生TextureAtlas素材的方式

方法一、使用TexturePacker

軟體官網:http://www.codeandweb.com/texturepacker
範例圖檔下載:woman
螢幕快照 2014-02-12 下午2.39.46
首先,要先把圖檔整理成多個png圖檔,若是連續的圖檔,則需要在後面加0001~~XXXX之類的數字,固定是四個數字。若是單一圖檔則可以不用加。到時在取圖檔時,例如本範例是woman0001~woman0028,則只需要用woman當前置詞就可以取出全部的動態圖檔了

var woman:MovieClip = new MovieClip(atlas.getTextures("woman"),30);

而在操作TexturePacker時,最重要的是Data Format要選擇Sparrow/Starling。

索取TexturePacker免費序號

免費序號申請單:http://www.codeandweb.com/request-free-license

首先要說一下這套軟體的開發者真的很用心,當時看到有Blog說如果是有部落格的開發者,可以寫信去申請免費序號。我寫了申請表後,他回信了這封信給我:

Hi Claire,

Here’s your license key for TexturePacker:
TP-xxxxxxxxxxxxxxxx
I’ve added a license for PhysicsEditor (see file attached) in case you might want to try it too 😉
Nice blog! I would be happy to get a (short) blog post in return.
In case you do a tutorial post about my tools I can link back to your blog from the tutorials section on my page. That might give you some more visitors on your page!

Kind regards
Kerstin on behalf of Andreas

因為還有我的名字,我就回信問他中文的部落格可以嗎?結果居然真的是人工回信的耶(本以為都是自動發信),而且回信速度很快,真的很用心在經營他的產品。

最酷的是,後來因為我在寫Starling前面的教程,所以遲遲未寫關於TexturePacker的介紹文,他居然隔了一段時間又寄了封信給我:

Dear Claire,

I sent you a blogger license for TexturePacker some time ago,
and I am curious how you like the program.
Did you get it running successfully? Or do you need some assistance?
I would be happy to get a (short) blog post in return.

Kind regards
Kerstin on behalf of Andreas

還會關心我們的使用狀況耶!真的是超用心的開發者~

方法二、使用Flash CC

Flash CC和之前的版本比起來,就是它終於支援可以把元件庫的東西匯出了。

只需要在元件庫按右鍵,就可以選擇是要將其匯出成連續png或者是直接匯出成Sprite Sheet,並可同時選擇多個圖檔然後一起匯在同一個Spite Sheet裡。相關操作教學請見此:Sprite Sheets in Flash Professional CS6
螢幕快照 2014-02-12 下午2.47.52
螢幕快照 2014-02-12 下午2.49.40

Posted on

Starling的Display Objects介紹(五)

上一篇:Starling的Display Objects介紹(四) 下一篇:產生TextureAtlas素材的方式 這篇會介紹starling.display.MovieClip以及starling.animation.Juggler

MovieClip物件介紹

官方手冊在此:http://doc.starling-framework.org/core/starling/display/MovieClip.html 在Starling裡面的MovieClip和原生的MovieClip差異蠻大的,列舉說明如下:

  1. 每一個MovieClip都可設定不同的fps(需在new MovieClip時指定):這是因為一般來說在Starling裡的frameRate都會設定的很高,但動畫可能不會有這麼多圖片可跑,因此每一個MovieClip
  2. 由一連串的連續圖檔組成:MovieClip是由一連串的動畫圖片(TextureAtlas)輪流播放。
  3. MovieClip裡面無法有任何物件:在Starling裡的MovieClip並不是繼承DisplayObjectContainer,而是繼承於Image,因此無法addChild()。我們可以想像MovieClip在Starling裡是一個Image下面放著一張很大的png,然後有一個方型遮罩,不停的變換顯示的區塊。
  4. 動畫效果必需由Juggler驅動:在Starling裡所有的動畫物件都必需實作IAnimatable這個介面。而所有的動畫效果則統一由Juggler驅動(另外還包括Tween、DelayedCall)。
  5. 沒有frameLabel的概念(這部份有些Starling extension有加上去此功能)
  6. 當isComplete等於true時會停止動畫的播放

順便介紹兩個好用的method。第一個為setFrameDuration(),可以另外再設定某個影格的停留時間,影格數從0開始。而setFrameSound()可以設定播放到某影格時播放一個聲音檔。 連續圖檔的產生方式請見此文章:產生TextureAtlas的方式

Juggler物件介紹

官方手冊在此:http://doc.starling-framework.org/core/starling/animation/Juggler.html 介紹在此:http://grayliao.blogspot.tw/2011/11/starling-framework6jugglertweendelaycal.html

Juggle是個簡單的Class,用來控制動畫的進行。他負責管理經由add()加進來的實現IAnimatable介面的物件,然後當Juggler的advanceTime()被呼叫時,它會負責去呼叫這些IAnimatable的advanceTime(),讓動畫進行下去;而當某個IAnimatable到達complete狀態時,則會被Juggler踢出去。我們就只要負責每個frame去呼叫Juggler的advanceTime()就好。而Starling class裡有個預設的juggler,當Starling.current正在運行時,Starling.juggler在每個frame時會自動被呼叫advanceTime()。通常我們把遊戲裡的動畫加到Starling.juggler裡,而一些特殊的動畫,例如遊戲暫停時要撥放的動畫,再加到另一個我們新增的Juggler,然後每個frame去呼叫它的advanceTime()。這裡講的每個frame,我們是使用EnterFrameEvent.ENTER_FRAME,而不是Event.ENTER_FRAME,因為EnterFrameEvent可以取得passedTime,這個passTime是指跟上一次事件發生經過的時間,可以傳給Juggle的advanceTime()的第一個參數。用經過時間來播放動畫,這樣就不會受frame數不穩定而影響動畫撥放的時間。 而要實現IAnimatable介面,只要實作advanceTime()這個方法,並且要設定一個complete條件,當達到這個條件時將自己的isComplete設為true,這樣就可以自動被Juggle移除。

簡單的MovieClip範例

因為在Starling裡面,不論是MovieClip或是Button,都是正方形的。若要去判別透明,將透明的Touch事件設為無效,都需要去覆寫原有的類別裡的hitTest函數,以最原始的BitmapData的hitTest去判別是否為透明圖層。 這邊有一個已寫好的類別:AlphaMovieClip,已經寫好將透明圖層的所有hitTest事件設為無效。若有這個需求的人可以使用此類別來應用。下面是一個我寫的簡單應用範例,可點此下載原始檔:StarlingTest StarlingTest.as

package
{
	import flash.display.Sprite;

	import starling.core.Starling;

	[SWF(frameRate="60",Width="800",Height="600")]
	public class StarlingTest extends Sprite
	{
		public function StarlingTest()
		{
			var star:Starling = new Starling(Main, stage);
			star.start();
		}
	}
}

Main.as

package {
	import flash.display.Bitmap;

	import starling.core.Starling;
	import starling.display.MovieClip;
	import starling.display.Sprite;
	import starling.events.Touch;
	import starling.events.TouchEvent;
	import starling.events.TouchPhase;
	import starling.textures.Texture;
	import starling.textures.TextureAtlas;

	public class Main extends Sprite {
		[Embed(source = 'test.xml', mimeType = 'application/octet-stream')]
		private var AtlasXML:Class;

		[Embed(source = 'test.png')]
		private var AtlasTexture:Class;

		private var mc:AlphaMovieClip ;
		public function Main() {
			var bitmap:Bitmap = new AtlasTexture();
			var texture:Texture = Texture.fromBitmap(bitmap);
			var xml:XML = XML(new AtlasXML());
			var atlas:TextureAtlas = new TextureAtlas(texture, xml);

			mc = new AlphaMovieClip("run",atlas, bitmap.bitmapData,30);
			var m2:MovieClip = new MovieClip(atlas.getTextures("run"),30);
			m2.loop = false;
			m2.x = 200;
			mc.addEventListener(TouchEvent.TOUCH, touchEventHandler);
			addChild(mc);
			addChild(m2);

			Starling.juggler.add(mc);
			Starling.juggler.add(m2);
		}

		private function touchEventHandler(event:TouchEvent):void {
			var touch:Touch = event.getTouch(this);
			if(!touch ) return;
			if (touch.phase == TouchPhase.BEGAN){
				mc.pause();
			}else if(touch.phase == TouchPhase.ENDED){
				mc.play();
			}
		}
	}
}

AlphaMovieClip.as

package {
	import flash.display.BitmapData;
	import flash.geom.Point;
	import flash.geom.Rectangle;
	import flash.utils.Dictionary;
	import starling.display.DisplayObject;
	import starling.display.MovieClip;
	import starling.textures.SubTexture;
	import starling.textures.Texture;
	import starling.textures.TextureAtlas;

	public class AlphaMovieClip extends MovieClip
	{
		private var m_TexturePrefix	:String				= "";
		private var m_TextureAtlas	:TextureAtlas		= null;
		private var m_Textures		:Vector.	= null;
		private var m_TextureInfo	:Dictionary			= null;
		private var m_BitmapData	:BitmapData			= null;

		public function AlphaMovieClip(texturePrefix:String, textureAtlas:TextureAtlas, bitmapData:BitmapData, fps:Number = 12)
		{
			m_TextureInfo = new Dictionary();

			var names:Vector. = textureAtlas.getNames(texturePrefix);
			for each (var name:String in names)
			{
				var textureInfo:Object = { };
				textureInfo.name = name;
				textureInfo.texture = textureAtlas.getTexture(name);
				m_TextureInfo[name] = textureInfo;
			}

			m_TexturePrefix = texturePrefix;
			m_TextureAtlas = textureAtlas;
			m_Textures = textureAtlas.getTextures(texturePrefix);
			m_BitmapData = bitmapData;

			super(m_Textures, fps);
		}

		override public function hitTest(localPoint:Point, forTouch:Boolean = false):DisplayObject
		{
			if (forTouch && visible && touchable)
			{
				if (getBounds(this).containsPoint(localPoint))
				{
					var texture:Texture = getFrameTexture(currentFrame);
					var subtexture:SubTexture = texture as SubTexture;
					var textureFrame:Rectangle = subtexture.frame;
					var clipping:Rectangle = subtexture.clipping;
					var frameBound:Rectangle = new Rectangle(
						Math.abs(textureFrame.x),
						Math.abs(textureFrame.y),
						clipping.width * m_TextureAtlas.texture.width,
						clipping.height * m_TextureAtlas.texture.height
					);
					clipping.x *= m_TextureAtlas.texture.width;
					clipping.y *= m_TextureAtlas.texture.height;

					var final_x:uint = (frameBound.containsPoint(localPoint) ? localPoint.x - frameBound.x : uint.MAX_VALUE);
					var final_y:uint = (frameBound.containsPoint(localPoint) ? localPoint.y - frameBound.y : uint.MAX_VALUE);

					if (final_x != uint.MAX_VALUE && final_y != uint.MAX_VALUE)
					{
						var pixel:uint = m_BitmapData.getPixel32(clipping.x + final_x, clipping.y + final_y);
						if (uint((pixel >> 24) & 0xFF) == 0)
						{
							return null;
						}
					}
					else
					{
						return null;
					}
				}
			}
			return super.hitTest(localPoint, forTouch);
		}
	}
}

test.png
test
test.xml

<?xml version="1.0" encoding="UTF-8"?>
<textureAtlas imagePath="test.png">
    <subTexture name="run0001" x="2" y="2" width="94" height="156" frameX="0" frameY="-4" frameWidth="100" frameHeight="160"/>
    <subTexture name="run0002" x="98" y="2" width="94" height="150" frameX="0" frameY="-10" frameWidth="100" frameHeight="160"/>
    <subTexture name="run0003" x="194" y="2" width="98" height="148" frameX="-1" frameY="-12" frameWidth="100" frameHeight="160"/>
    <subTexture name="run0004" x="294" y="2" width="100" height="154" frameX="0" frameY="-6" frameWidth="100" frameHeight="160"/>
    <subTexture name="run0005" x="396" y="2" width="98" height="160" frameX="0" frameY="0" frameWidth="100" frameHeight="160"/>
    <subTexture name="run0006" x="2" y="164" width="96" height="160" frameX="0" frameY="0" frameWidth="100" frameHeight="160"/>
    <subTexture name="run0007" x="100" y="164" width="96" height="158" frameX="-1" frameY="-2" frameWidth="100" frameHeight="160"/>
    <subTexture name="run0008" x="198" y="164" width="96" height="152" frameX="-1" frameY="-8" frameWidth="100" frameHeight="160"/>
    <subTexture name="run0009" x="296" y="164" width="98" height="150" frameX="-1" frameY="-10" frameWidth="100" frameHeight="160"/>
    <subTexture name="run0010" x="396" y="164" width="100" height="156" frameX="0" frameY="-4" frameWidth="100" frameHeight="160"/>
    <subTexture name="run0011" x="2" y="326" width="98" height="160" frameX="0" frameY="0" frameWidth="100" frameHeight="160"/>
    <subTexture name="run0012" x="102" y="326" width="96" height="160" frameX="-1" frameY="0" frameWidth="100" frameHeight="160"/>
</textureAtlas>
Posted on 2 Comments

Starling的Display Objects介紹(四)

上一篇:Starling的Display Objects介紹(三)
下一篇:Starling的Display Objects介紹(五)

這篇會介紹下圖裡的starling.display.Quad以及starling.display.Image
class_hierarchy

Quad物件介紹

官方手冊在此:http://doc.starling-framework.org/core/starling/display/Quad.html

A Quad represents a rectangle with a uniform color or a color gradient.

每一個端點都可以設定一個顏色,會呈現線性漸層。要顯示一個線性的漸變色,需要把一個色值設置給頂點0和頂點1,然後另一個顏色給頂點2和頂點3。

頂點位置是這樣安排的::

      0 - 1
      | / |
      2 - 3

在這個物件裡面,可以看到一個叫做mVertexData的屬性。在Starling Framework簡介的地方曾經說過,Starling是基於Stage3D而建的,關於3D渲染基礎原理請見此:3D渲染基礎原理VertexData官方介紹。所謂3D其實是一組3維的坐標,經由矩陣轉換,將之投影到2D螢幕上,計算其在2D畫面上的2D坐標,如下圖所示:
201212141827425715201212141827546379
在Starling裡面,因為是2D遊戲,則是使用正交投影的方式,直接去掉z軸的值,來將頂點坐標從3維轉至2維。但操作原理不變,這邊的則是要輸入四邊型的頂點數據。正交投影示意如下圖:
201212141827541985

下面是產生寬高各為200,200的方塊的簡單範例:

package {
	import starling.display.Quad;
	import starling.display.Sprite;
	import starling.events.Event;
	public class Game extends Sprite {
		private var q:Quad;
		public function Game() {
			addEventListener(Event.ADDED_TO_STAGE, onAdded);
		}
		private function onAdded ( e:Event ):void {
			q = new Quad(200, 200);
			q.color = 0x00FF00;
			q.x = stage.stageWidth - q.width >> 1;
			q.y = stage.stageHeight - q.height >> 1;
			addChild ( q );
		}
	}
}

Image物件介紹

官方手冊在此:http://doc.starling-framework.org/core/starling/display/Image.html

一個圖片(Image)其實就是一個四邊形上面映射了一個紋理(Texture),以下圖來說,兩個三角形是Quad的範圍,而Texture就是藍色衣服的娃娃的PNG圖檔,代表貼圖的材質。

螢幕快照 2014-02-11 下午4.32.05
Image相當於Flash的Bitmap類的Starling版本。但是Starling是用Texture來代替BitmapData來為圖像提供像素數據。 要顯示一個Texture,需要把它映射到一個四邊形上,而這就是Image這個類所實現的功能。

一個”Image”是繼承自”Quad”的,我們可以在Quad上設置顏色,對於每個像素來說,最終的顏色是根據紋理的顏色和四邊形的顏色相乘而來的。 這樣您就可以很容易用Quad的顏色改變一個紋理的色調。您還可以在不改變任何四邊形的頂點坐標的情況下,在一個圖片的內部移動紋理。用此功能,可以以一個非常有效的方式,創建一個矩形遮罩。

下面是一個簡單的Image使用範例:
package {
import flash.display.Bitmap;
import starling.display.Image;
import starling.display.Sprite;
import starling.events.Event;
import starling.textures.Texture;
import starling.utils.deg2rad;
public class Game2 extends Sprite {
private var sausagesVector:Vector. = new Vector.(NUM_SAUSAGES, true);
private const NUM_SAUSAGES:uint = 400;

[Embed(source = “boy.png”)]
private static const Sausage:Class;

public function Game2() {
addEventListener(Event.ADDED_TO_STAGE, onAdded);
}

private function onAdded (e:Event):void {
// create a Bitmap object out of the embedded image
var sausageBitmap:Bitmap = new Sausage();
// create a Texture object to feed the Image object
var texture:Texture = Texture.fromBitmap(sausageBitmap);
for (var i:int = 0; i < NUM_SAUSAGES; i++) { // create a Image object with our one texture var image:Image = new Image(texture); // set a random alpha, position, rotation image.alpha = Math.random(); // define a random initial position image.x = Math.random()*stage.stageWidth image.y = Math.random()*stage.stageHeight image.rotation = deg2rad(Math.random()*360); // show it addChild(image); // store references for later sausagesVector[i] = image; } } } }[/code]

Posted on 1 Comment

Starling的Display Objects介紹(三)

上一篇:Starling的Display Objects介紹(二)
下一篇:Starling的Display Objects介紹(四)

這篇會介紹下圖裡的starling.display.Button以及starling.display.Sprite
class_hierarchy

Button物件介紹

官方手冊在此:http://doc.starling-framework.org/core/starling/display/Button.html

和Flash的SimpleButton的不同點,是它只有兩個狀態的圖檔,也就是upState與downState,而沒有over的狀態。它的disabled樣式可以經由alphaWhenDisabled的屬性去設定Disabled時的圖檔透明度。

另外,按下Button會觸發的事件是Event.TRIGGERED,因此若我們要監聽一個Button按下的事件,可用下面的方式去監聽:

menuContainer.addEventListener(Event.TRIGGERED, onTriggered);
private function onTriggered(e:Event):void {
    // outputs : [object Sprite] [object Button]
    trace ( e.currentTarget, e.target );
    // outputs : triggered!
    trace ("triggered!");
}

這是starling.display.Button一個簡單的使用範例:

package {
	import flash.display.Bitmap;
	import starling.display.Button;
	import starling.display.Sprite;
	import starling.events.Event;
	import starling.textures.Texture;

	public class Game extends Sprite {
		[Embed(source = "../media/textures/button_up.png")]
		private static const Button_UP:Class;

		[Embed(source = "../media/textures/button_down.png")]
		private static const Button_DOWN:Class;

		public function Game() {
			addEventListener(Event.ADDED_TO_STAGE, onAdded);
		}

		private function onAdded (e:Event):void {
			// create a Bitmap object out of the embedded image
			var buttonSkinUp:Bitmap = new Button_UP();
			var buttonSkinDown:Bitmap = new Button_DOWN();

			// 創建按鈕
			var myButton:Button = new Button(Texture.fromBitmap(buttonSkinUp), "這是按鈕", Texture.fromBitmap(buttonSkinDown));

			// 創建Menu容器並把按鈕加上去
			var menuContainer:Sprite = new Sprite();
			menuContainer.addChild(myButton);

			// centers the menu
			menuContainer.x = stage.stageWidth - menuContainer.width &gt;&gt; 1;
			menuContainer.y = stage.stageHeight - menuContainer.height &gt;&gt; 1;

			// show the button
			addChild(menuContainer);
		}
}
}

要注意的是,在starling裡面沒有hit area的設計,因為圖片有Bounds和Frame兩個屬性,所以要確定是否是碰到bounds的話,可以覆寫原有的hitTest函數,範例如下:

public override function hitTest( localPoint:Point, forTouch:Boolean=false ) :DisplayObject
{
	// on a touch test, invisible or untouchable objects cause the test to fail
	if( forTouch &amp;&amp; (!visible || !touchable) )
	{
		return null;
	}

	// otherwise, check bounding box of hitArea (which is a Rectangle here)
	var result:DisplayObject = null;
	if( _hitArea.containsPoint( localPoint ) )
	{
		result = this;
	}

	return result;
}

若是要偵測是否碰到透明區塊,則要使用原生的BitmapData.hitTest去測試,使用方法如下:

public hitTest(firstPoint:Point, firstAlphaThreshold:Number, secondObject:Object, [secondBitmapPoint:Point], [secondAlphaThreshold:Number]) : Boolean

Sprite物件

Sprite官方手冊在此:http://doc.starling-framework.org/core/starling/display/Sprite.html

DisplayObjectContainer官方手冊在此:http://doc.starling-framework.org/core/starling/display/DisplayObjectContainer.html

除了DisplayObjectContainer的功能以外,還多了一個flatten的屬性,這個屬性可以利用一些讓這個Sprite在播放動畫時更加的順暢,但若是開啟了flatten機制,所有之後對畫面的alpha、rotation和位置的改變都無法在畫面上被呈現。所以在使用此一屬性時要更加的小心。

Sprite一個專門用來放許多其他元件的標準容器,它可被偵聽下面這些事件:

  • Event.ADDED: the object was added to a parent.
  • Event.ADDED_TO_STAGE: the object was added to a parent that is connected to the stage, thus becoming visible now.
  • Event.REMOVED: the object was removed from a parent.
  • Event.REMOVED_FROM_STAGE: the object was removed from a parent that is connected to the stage, thus becoming invisible now.
  • KeyboardEvent.KEY_DOWN: 當按下按鍵時觸發
  • KeyboardEvent.KEY_UP: 當離開按鍵時觸發
  • EnterFrameEvent.ENTER_FRAME: 影格前進時觸發事件,根據frameRate的設定來決定一秒觸發幾次
    [SWF(frameRate="60", width="1024", height="768", backgroundColor="0x000000")]
  • Event.FLATTEN: 當開啟或關閉flatten功能時會觸發事件/li>
Posted on 2 Comments

Starling的Display Objects介紹(二)

上一篇:Starling的Display Objects介紹(一)
下一篇:Starling的Display Objects介紹(三)

這篇會介紹下圖裡的starling.text.TextField
class_hierarchy

TextField物件介紹

官方手冊請見此:http://doc.starling-framework.org/core/starling/text/TextField.html

下面是一個最簡單的使用範例:

package {

	import starling.display.Sprite;
	import starling.events.Event;
	import starling.text.TextField;

	public class Game extends Sprite {

		public function Game() {
			addEventListener(Event.ADDED_TO_STAGE, onAdded);
		}

		private function onAdded (e:Event):void {
			// create the TextField object
			var legend:TextField = new TextField(300, 300, "簡單的文字範例", "Verdana", 38, 0xFFFFFF);
			// centers the text on stage
			legend.x = stage.stageWidth - legend.width &gt;&gt; 1;
			legend.y = stage.stageHeight - legend.height &gt;&gt; 1;
			// show it
			addChild(legend);
		}
	}
}

內嵌字型方式比較

在Starling裡的TextField可以用兩種方式去嵌入特殊字型,如下圖所示:
2014-01-17_153055
從上圖我們可以發現,原始的字體嵌入方式,在1到2的部份,將字型從ttf裡抽取出來壓成Bitmap Snapshot,這部份會需要使用到CPU來做運算。因為會多一個程序,在效能上,會比右邊的方式慢一些。Bitmap Font則是使用一份字型列表的圖檔(如下圖),去比對xml的字型資訊檔,它完全只會用到GPU的運算,在效能上優於傳統字體嵌入的方式。
fontRegular字型範例下載:fontRegular

但是若我們要求字體在各種解析度都要能夠有很高的解析,由於原始的字型嵌入方式是即時將字型轉換成Bitmap圖檔,在各種大小都可以有良好的表現。而若我們想要使用不同大小的Bitmap字型,則需要在產生文字圖檔時就決定要使用那些大小的字型,而不能在執行時才決定要顯示的文字大小為何。

在下面的Bitmap Font產生工具裡都可以有設定的選項,包括要使用那些文字、字體、等等…,以及字型要叫什麼都可以在產生時設定好。

Bitmap Font產生工具

這邊有幾個可以產生Bitmap文字圖檔及.fnt檔案的工具:

  1. Glyph Designer(適用於Mac)
    螢幕快照 2014-02-07 下午9.58.42
  2. BMFont(適用於Windows)
    螢幕快照 2014-02-07 下午9.59.34

內嵌字型實作範例

下面我們簡介一下這兩種方式的實作方式:

  1. Standard TrueType fonts:也就是一般內嵌字型的方式,將.ttf的文字檔案直接用embed的方式嵌入swf裡。
    下面是一個簡單的範例:

    package {
    	import flash.text.Font;
    	import starling.display.Sprite;
    	import starling.events.Event;
    	import starling.text.TextField;
    
    	public class Game extends Sprite {
    		[Embed(source='/../media/fonts/Abduction.ttf', embedAsCFF='false', fontName='Abduction')]
    		public static var Abduction:Class;
    
    		public function Game() {
    			addEventListener(Event.ADDED_TO_STAGE, onAdded);
    		}
    
    		private function onAdded (e:Event):void {
    			// create the font
    			var font:Font = new Abduction();
    			// create the TextField object
    			var legend:TextField = new TextField(300, 300, "使用內嵌字型的簡單範例!", font.fontName, 38, 0xFFFFFF);
    			// centers the text on stage
    			legend.x = stage.stageWidth - legend.width &gt;&gt; 1; legend.y = stage.stageHeight - legend.height &gt;&gt; 1;
    			// show it
    			addChild(legend);
    		}
    	}
    }
    
  2. Bitmap fonts:If you need speed or fancy font effects, use a bitmap font instead. That is a font that has its glyphs rendered to a texture atlas. To use it, first register the font with the method registerBitmapFont, and then pass the font name to the corresponding property of the text field.
    一個使用Bitmap來當作字型檔案的簡單範例如下:
    字型檔案下載:fontRegular

    package
    {
    	import flash.display.Bitmap;
    	import starling.display.Sprite;
    	import starling.events.Event;
    	import starling.text.BitmapFont;
    	import starling.text.TextField;
    	import starling.textures.Texture;
    	import starling.utils.Color;
    
    	public class Game extends Sprite {
    
    		[Embed(source = "../media/fonts/fontRegular.png")]
    		private static const BitmapChars:Class;
    		[Embed(source="../media/fonts/fontRegular.fnt", mimeType="application/octet-stream")]
    		private static const BritannicXML:Class;
    
    		public function Game() {
    			addEventListener(Event.ADDED_TO_STAGE, onAdded);
    		}
    
    		private function onAdded (e:Event):void {
    			// creates the embedded bitmap (spritesheet file)
    			var bitmap:Bitmap = new BitmapChars();
    			// creates a texture out of it
    			var texture:Texture = Texture.fromBitmap(bitmap);
    
    			// create the XML file describing the glyphes position on the spritesheet
    			var xml:XML = XML(new BritannicXML());
    			// register the bitmap font to make it available to TextField
    			TextField.registerBitmapFont(new BitmapFont(texture, xml));
    			// create the TextField object
    			var bmpFontTF:TextField = new TextField(400, 400, "使用內嵌字型的簡單範例!", "BritannicBold", 10);
    			// the native bitmap font size, no scaling
    			bmpFontTF.fontSize = BitmapFont.NATIVE_SIZE;
    			// use white to use the texture as it is (no tinting)
    			bmpFontTF.color = Color.WHITE;
    			// centers the text on stage
    			bmpFontTF.x = stage.stageWidth - bmpFontTF.width &gt;&gt; 1;
    			bmpFontTF.y = stage.stageHeight - bmpFontTF.height &gt;&gt; 1;
    			// show it
    			addChild(bmpFontTF);
    		}
    	}
    }

參考資料

  1. The Starling Manual » Displaying Text
  2. TextField API
  3. Starting with Starling – Ep 10: Text and Fonts
Posted on 2 Comments

Starling的Display Objects介紹(一)

上一篇:Starling Framework簡介
下一篇:Starling的Display Objects介紹(二)

Starling framework啟動方式

所有使用Starling framework的應用程式的起始點,都是由一個Starling物件,來創建整個Starling世界(Starling物件說明可見此:Starling),下面是一個最簡單的範例:

package{
    import starling.core.Starling;
    import starling.display.Sprite;

    [SWF(width="1280", height="752", frameRate="60", backgroundColor="#000000")]
    public class Startup extends Sprite
    {
        private var mStarling:Starling;
        public function Startup() {
            // 建立Starling物件
            mStarling = new Starling(Game, stage);
            // start it!
            mStarling.start();
        }
    }
}

Starling世界的物件樹

官方的說明文件裡可以看到在Starling裡,畫面物件的繼承樹是長這樣的:
class_hierarchy
從上圖可看出在Starling裡面,DisplayObject是一切畫面物件的祖先,繼承於EventDispatcher。

DisplayObject物件介紹

官方手冊請見此:http://doc.starling-framework.org/core/starling/display/DisplayObject.html

這是所有物件樹的根物件,他的子孫包含像Quad、Image、MovieClip,這一邊是在做動畫影片的。另一邊像是DisplayObjectContainer則是放物件的容器,顧名思義,它可以再加入其他的DisplayObject在裡面。反向來說,在Starling世界裡面的MovieClip,是沒有辦法使用addChild的,它只能像是一個動畫影片一樣的單純被播放、控制位置、旋轉、或偵測碰撞,而無法在MovieClip裡面加入其他的MovieClip

在Starling的DisplayObject其實只是一個abstract class,他沒有辦法被直接new出來,一定要被繼承並實作這兩個方法:

//要實作要如何利用Stage3D來產生畫面的方式
function render(support:RenderSupport, parentAlpha:Number):void;
//實作物件碰撞偵測的方式
function getBounds(targetSpace:DisplayObject, resultRect:Rectangle=null):Rectangle

從上面的繼承樹我們可以發現MovieClip與DisplayObjectContainer是採用不一樣的碰撞偵測方法以及圖形render方式的。

在Starling裡的DisplayObject則有偵測多點觸控,以及設定物件坐標、及與不同層DisplayObjectContent的坐標轉換功能。

Stage物件介紹

官方手冊請見此:http://doc.starling-framework.org/core/starling/display/Stage.html

Starling物件有它主場景物件Stage,也就是上圖的Starling.display.Stage,它和flash裡的Stage一樣,是放所有物件的母容器(The Starling stage object, which is the root of the display tree that is rendered)。

這個物件裡面只能夠有繼承於starling.display.DisplayObject的物件,而無法包含任何flash.display.DisplayObject相關的物件,這兩種類別是完全不能兼容的。雖然在Starling裡面,可以用

Starling.current.nativeOverlay.addChild(textInput);

來加入原生flash物件,但就如我前一篇簡介所說,其實他也只是會取得flash.display.Stage的物件把元件放到裡面而已,它永遠都會被放在畫面的最上層。
螢幕快照 2014-02-01 下午11.45.51

Stage會在創建Starling物件時被自動創建,所以不用自己去建立它。

參考資料

  1. The Starling Manual > Display Objects
  2. Display Object API
  3. Juggler API
  4. Starling API
Posted on 2 Comments

Starling Framework簡介

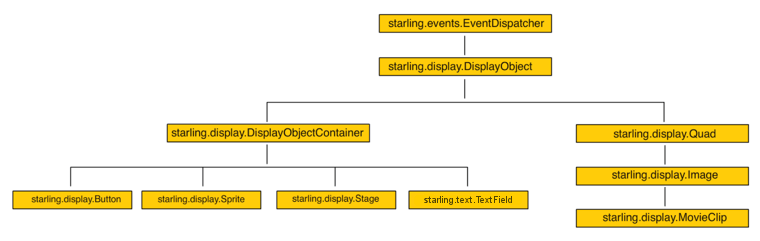
下一篇:Starling的Display Objects介紹(一)

Starling的技術基礎

Starling是基於Stage3D來實作的,因此在學習Starling之前,我建議應該要對Stage3D的特性有基礎的了解。有關於Stage3D的介紹可以看這篇文章:Stage3D運作原理。在這篇文章裡,我們可以知道Stage3D比起OpenGL及DirectX等傳統3D的APIs的優勢與劣勢。

Stage3D會依發佈平台的不同而使用不一樣的GPU運算引擎,例如在mac電腦上所使用的是OpenGL,而在Windows則會視電腦所使用的硬體設備去選擇所使用的基礎技術。值得一提的是,即使遇到不支援的硬體,Stage3D仍然可以使用軟件模式去做3D運算,只是會變得十分的緩慢。這邊有一個簡單的性能比較:Stage3D vs WebGL 性能較量

下圖是Starling的技術基礎示意圖:

image

Starling運作模式

過去我們很容易因為Stage3D這個名字而誤會這是專門為3D而做的引擎,而不能使用在2D的技術上。3D引擎的運算與2D運算最大的差異點,在於3D畫面是由一個個三角型為基礎,去建構整個畫面。而2D的向量圖形,則是由多個頂點組合而成的複雜多邊型。

要將3D的技術使用在2D上,便是將圖片整理成png或jpg等圖片,然後將圖片視為兩個三角型去繪製物件,再加上貼材質的方式,將人物的圖片貼至範圍裡。這樣便可以利用GPU去執行它最擅長的三角型繪製以及材質貼圖的動作。


螢幕快照 2014-02-01 下午11.37.51

Starling簡單範例

這是一個最簡單的Starling Sample:StarlingTest
StarlingTest.as

package
{
	import flash.display.Sprite;

	import starling.core.Starling;

	[SWF(frameRate="60",Width="800",Height="600")]
	public class StarlingTest extends Sprite
	{
		public function StarlingTest()
		{
			var star:Starling = new Starling(Main, stage);
			star.start();
		}
	}
}

Main.as

package
{
	import starling.core.Starling;
	import starling.display.MovieClip;
	import starling.display.Sprite;
	import starling.textures.Texture;
	import starling.textures.TextureAtlas;

	public class Main extends Sprite
	{
		[Embed(source = 'test.xml', mimeType = 'application/octet-stream')]
		private var AtlasXML:Class;

		[Embed(source = 'test.png')]
		private var AtlasTexture:Class;

		public function Main()
		{
			var texture:Texture = Texture.fromBitmap(new AtlasTexture());
			var xml:XML = XML(new AtlasXML());
			var atlas:TextureAtlas = new TextureAtlas(texture, xml);

			var mc:MovieClip = new MovieClip(atlas.getTextures("run"),30);
			addChild(mc);

			Starling.juggler.add(mc);
		}
	}
}

全新的影格運作方式

從上面的Code來看,Flash programmer似乎會覺得好像和原本的程式幾乎一模一樣,其實這是Staring刻意希望讓程式師可以無痛學習Starling,刻意去這樣設計的。在很像的外表下,若我們使用Starling去建置我們的flash程式,不論在影格、圖形渲染方式、碰撞偵測方式、事件傳遞方式等。其實與原生程式,在根本上是完全不一樣的東西。也因為在基本概念上就有很大的不同(starling是以3D去模擬2D的環境,而原有的Flash則是完全使用CPU去做畫面的運算)。我建議所有Flash的開發者還是要以全新的角度去學習這套framework,並且要了解其根本的運作原理,這樣在操作上才不會被它與原生語言的不同之處搞混淆。

因此我們要知道,上面範例裡面的starling.display.MovieClip與原生的flash.display.MovieClip在本質上便已經是完全不同的東西了。在表現的圖層上也並不相同,下圖是圖層的示意圖:
螢幕快照 2014-02-01 下午11.45.51
從上圖可以看到,所有原來我們用flash.display.*去產生的畫面,一律會被放在最上面那層的『Display List』,而所有stage3D(在這裡也就是Starling)的物件則會放在它下面。另外StageVideo則是可以使用GPU去播放的影片,則會放在最下面一層。

這也可以看出,若是想要採用starling去開發你的應用程式,不太可能混合starling和原生的flash DisplayObject一起使用,因為原生的flash所產生的畫面會永遠的被放在starling之上(請見註一)。另外,若是使用starling,在嵌入swf至網頁時,一定要將wmode設成direct,starling不支援透明的嵌入方式,否則會跳出如下圖的錯誤訊息。

螢幕快照 2014-02-07 下午2.42.20

另外,雖然Starling很多類別的名稱或屬性都很相似,或者一樣,但用法其實也是有很大的不同。這邊是Starling的API手冊:Starling Framework Reference

註一:
我們可以利用nativeOverlay將原生的flash的displayObject放到starling的場景上。
請見下面的範例,下面範例是如何在starling裡加入可打字的文字框的方式。

var textInput:flash.text.TextField = new flash.text.TextField();
textInput.type = TextFieldType.INPUT;
Starling.current.nativeOverlay.addChild(textInput);

因為starling的textField本身是不能直接設定為可打字的,因此如果想要在場景上加一個可輸入文字的文字欄位,這邊有很詳細的方法介紹:Text Input with Starling framework
不過要注意,使用nativeOverlay所加進場景裡的物件,也是永遠會在最上層。下面是官網對於Native overlay的說明:

Sometimes you will want to display native Flash content on top of Starling. That’s what the nativeOverlay property is for. It returns a Flash Sprite lying directly on top of the Starling content. You can add conventional Flash objects to that overlay.

Beware, though, that conventional Flash content on top of 3D content can lead to performance penalties on some (mobile) platforms. For that reason, always remove all child objects from the overlay when you don’t need them any longer. Starling will remove the overlay from the display list when it’s empty.

參考資料